Complete Seed-VC Setup Guide: Voice Conversion with V2 Models (2025 Edition)
I recently embarked on a journey with Seed-VC, documenting every step meticulously – including all the errors, solutions, and discoveries along the way. This guide shares the exact error messages I encountered and the solutions that worked, so you’ll know precisely what to expect and how to handle each situation.

What’s New in 2025
Major Updates Since 2024
Seed-VC has undergone significant improvements:
- V2 Models Released: New CFM (Continuous Flow Matching) and AR (Autoregressive) models for enhanced voice and style conversion
- CUDA 12.6+ Support: Full compatibility with the latest CUDA versions
- Improved Performance: Up to 6x speed improvement with
--compileflag on V2 models - Style Transfer: Beyond voice conversion, now supports emotion, accent, and prosody transfer
- Streaming Support: Real-time processing for longer audio files with chunking
- BigVGAN Integration: NVIDIA’s BigVGAN provides substantial improvements for high-pitched singing voices
Initial Setup and First Roadblock
System Requirements (Updated for 2025)
Before diving in, ensure you have:
- Python 3.10 (still the recommended version)
- CUDA 11.8 or higher (12.6+ now fully supported)
- At least 8GB VRAM for optimal performance
- Windows 10/11, Linux, or macOS (with MPS support)
Checking Your Python Version
First, verify your Python installation:
python --version
If you don’t have Python 3.10, I recommend using pyenv (or pyenv-win for Windows) to manage multiple Python versions.
Installing Dependencies
My first attempt at installing dependencies used this command:
pip install -r requirements.txt
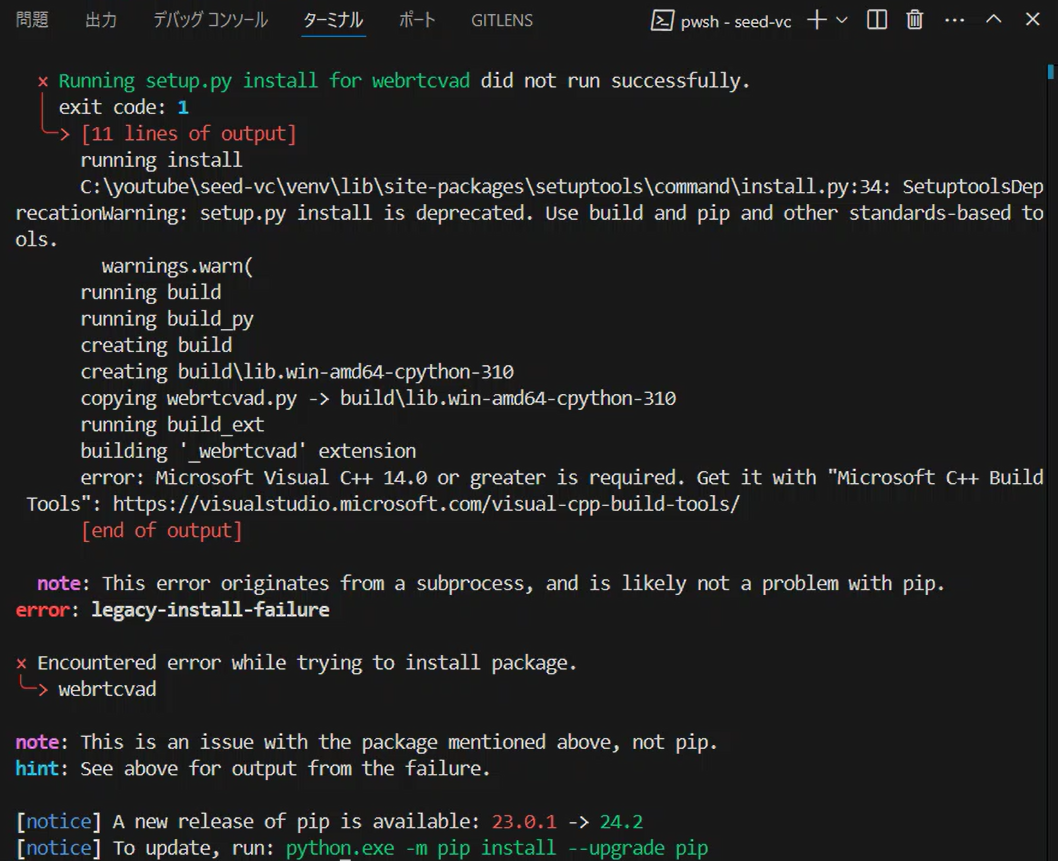
This resulted in an error message:
DEPRECATION: webrtcvad is being installed using the legacy 'setup.py install' method...
error: Microsoft Visual C++ 14.0 or greater is required. Get it with "Microsoft C++ Build Tools"
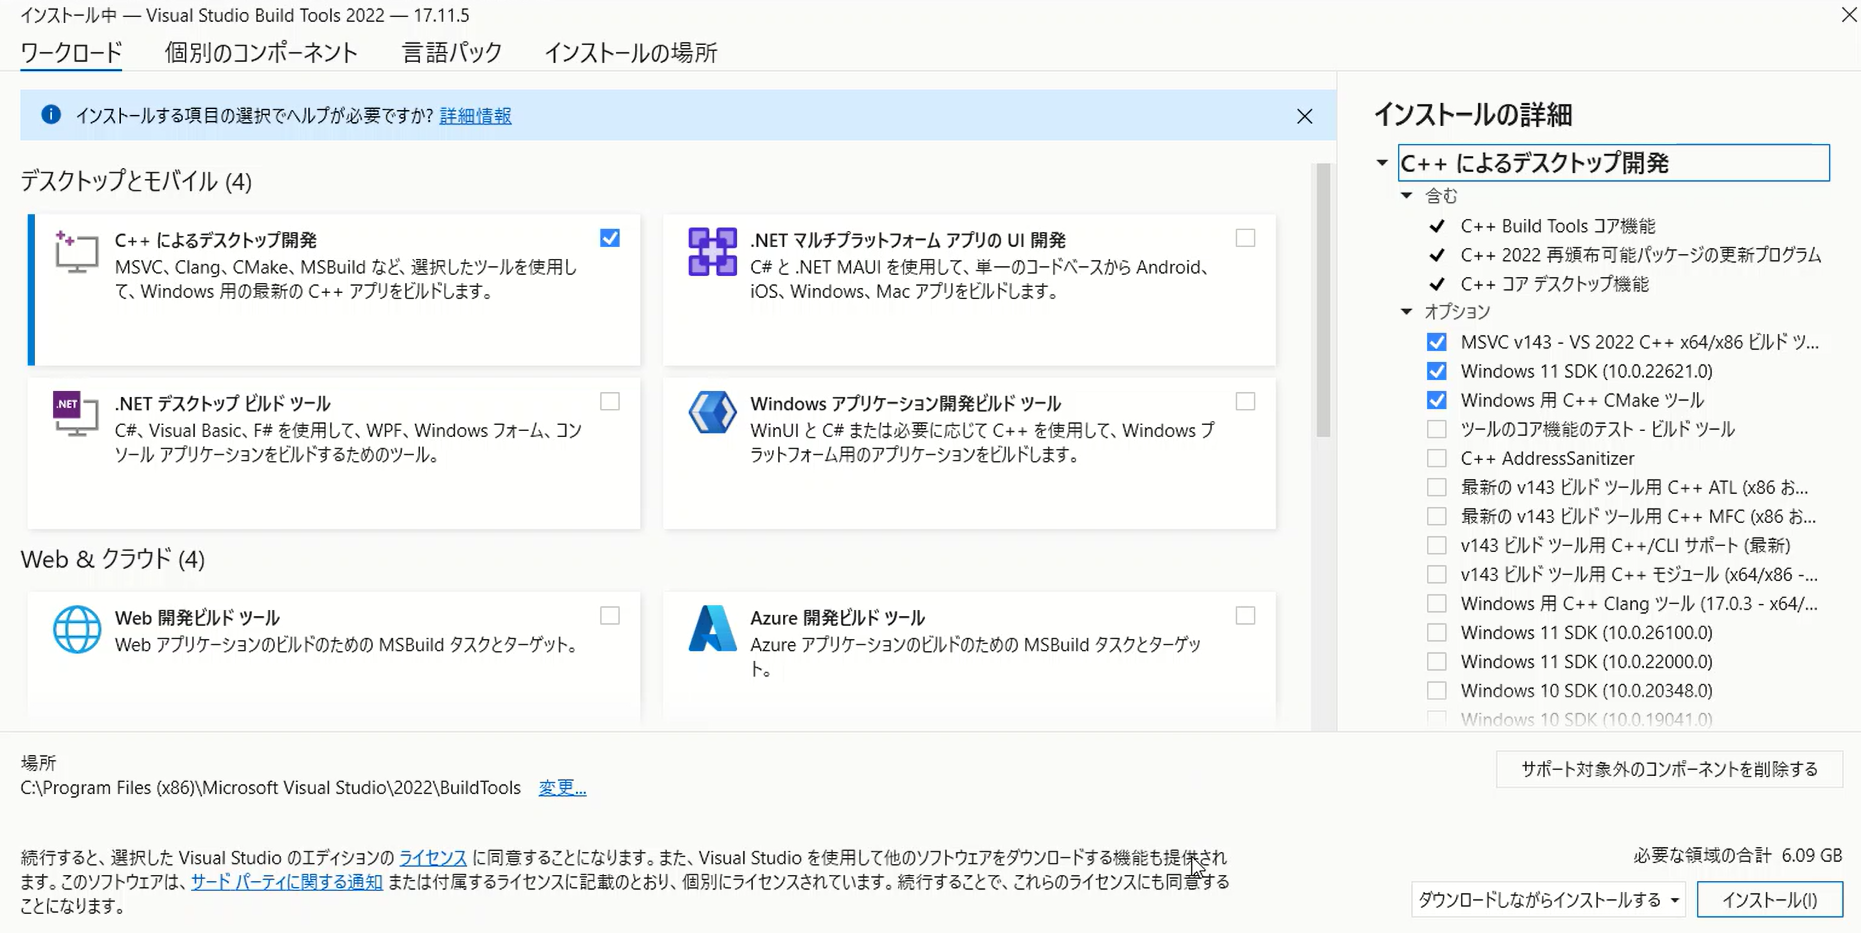
Resolving Build Tools Issue
The solution involves installing Microsoft C++ Build Tools. Here’s what you actually need:
- Download Microsoft C++ Build Tools from the official Microsoft website
- During installation, select:
- MSVC v143 – VS 2022 C++ x64/x86 build tools
- Windows 11 SDK (or Windows 10 SDK if on Windows 10)
- C++ CMake tools for Windows
After installation, restart your terminal and run:
pip install -r requirements.txt
CUDA Configuration Challenge (2025 Update)
Understanding CUDA Compatibility
One of the most crucial discoveries I made was about CUDA version compatibility. Seed-VC now supports CUDA versions from 11.8 to 12.8, but getting the right PyTorch installation is critical.
Checking CUDA Version
To identify your CUDA version:
nvcc --version
My output showed:
nvcc: NVIDIA (R) Cuda compiler driver
Copyright (c) 2005-2024 NVIDIA Corporation
Built on Thu_Mar_28_02:30:10_Pacific_Daylight_Time_2024
Cuda compilation tools, release 12.4, V12.4.131
Build cuda_12.4.r12.4/compiler.34097967_0
Updated PyTorch Installation for CUDA 12.6
As of 2025, here’s how to properly install PyTorch for different CUDA versions:
For CUDA 12.6 (most common in 2025):
pip install torch torchvision torchaudio --index-url https://download.pytorch.org/whl/cu126
For CUDA 12.4:
pip install torch torchvision torchaudio --index-url https://download.pytorch.org/whl/cu124
For CUDA 11.8 (older systems):
pip install torch torchvision torchaudio --index-url https://download.pytorch.org/whl/cu118
Important Discovery: PyTorch doesn’t require an exact CUDA version match. If you have CUDA 12.6 installed but PyTorch only supports up to 12.4, the 12.4 version will work fine.
Setting Up the Virtual Environment
After resolving the initial installation issues, I created a virtual environment. Here’s the complete workflow:
# Create virtual environment
python -m venv venv

# Activate on Windows
venv\Scripts\activate

# Activate on Linux/Mac
source venv/bin/activate
I found VS Code particularly helpful here – the integrated terminal handles activation seamlessly.
Working with Seed-VC V2 Models
Understanding the Model Architecture
Seed-VC V2 introduces two key components:
- CFM Model (Continuous Flow Matching): Handles the core voice conversion
- AR Model (Autoregressive): Manages style, emotion, and accent transfer
Running the Application (2025 Version)
The new unified app supports both V1 and V2 models:
# Run with both V1 and V2 models
python app.py --enable-v1 --enable-v2

# Run only V2 (recommended for new users)
python app.py --enable-v2

# Run with custom checkpoints
python app_vc_v2.py --cfm-checkpoint-path <path> --ar-checkpoint-path <path>
Automatic Model Downloads
When you first run:
python app.py --enable-v2
Seed-VC automatically downloads several essential models from Hugging Face:
- CFM Model: Core voice conversion (approximately 500MB)
- AR Model: Style transfer capabilities (approximately 300MB)
- CampPlus: Voice characteristic extraction
- BigVGAN v2: High-quality voice synthesis
If you can’t access Hugging Face due to network restrictions, use a mirror:
HF_ENDPOINT=https://hf-mirror.com python app.py --enable-v2
Performance Optimization (2025 Techniques)
Leveraging Compilation for Speed
One of the most significant improvements in 2025 is the --compile flag:
python app_vc_v2.py --compile
This enables torch.compile() optimization, providing up to 6x speed improvement on the AR model. However, note that:
- Initial compilation takes 3-5 minutes
- Requires additional memory
- Works best with CUDA 11.8+
Windows-Specific Optimization
For Windows users, install triton-windows for additional performance gains:
pip install triton-windows
CUDA Configuration for Maximum Performance
After extensive testing, I discovered the importance of matching CUDA versions properly. Here’s my optimized setup:
- Check your actual CUDA version:
nvidia-smi
- Update your requirements.txt to match:
--extra-index-url https://download.pytorch.org/whl/cu126
torch>=2.0.0
torchvision
torchaudio
- Rebuild your environment:
# Delete old venv
rmdir /s venv  # Windows
rm -rf venv    # Linux/Mac

# Create new environment
python -m venv venv
venv\Scripts\activate  # Windows
source venv/bin/activate  # Linux/Mac

# Install with correct CUDA
pip install -r requirements.txt
The performance improvement was remarkable – conversions that took minutes now complete in seconds.
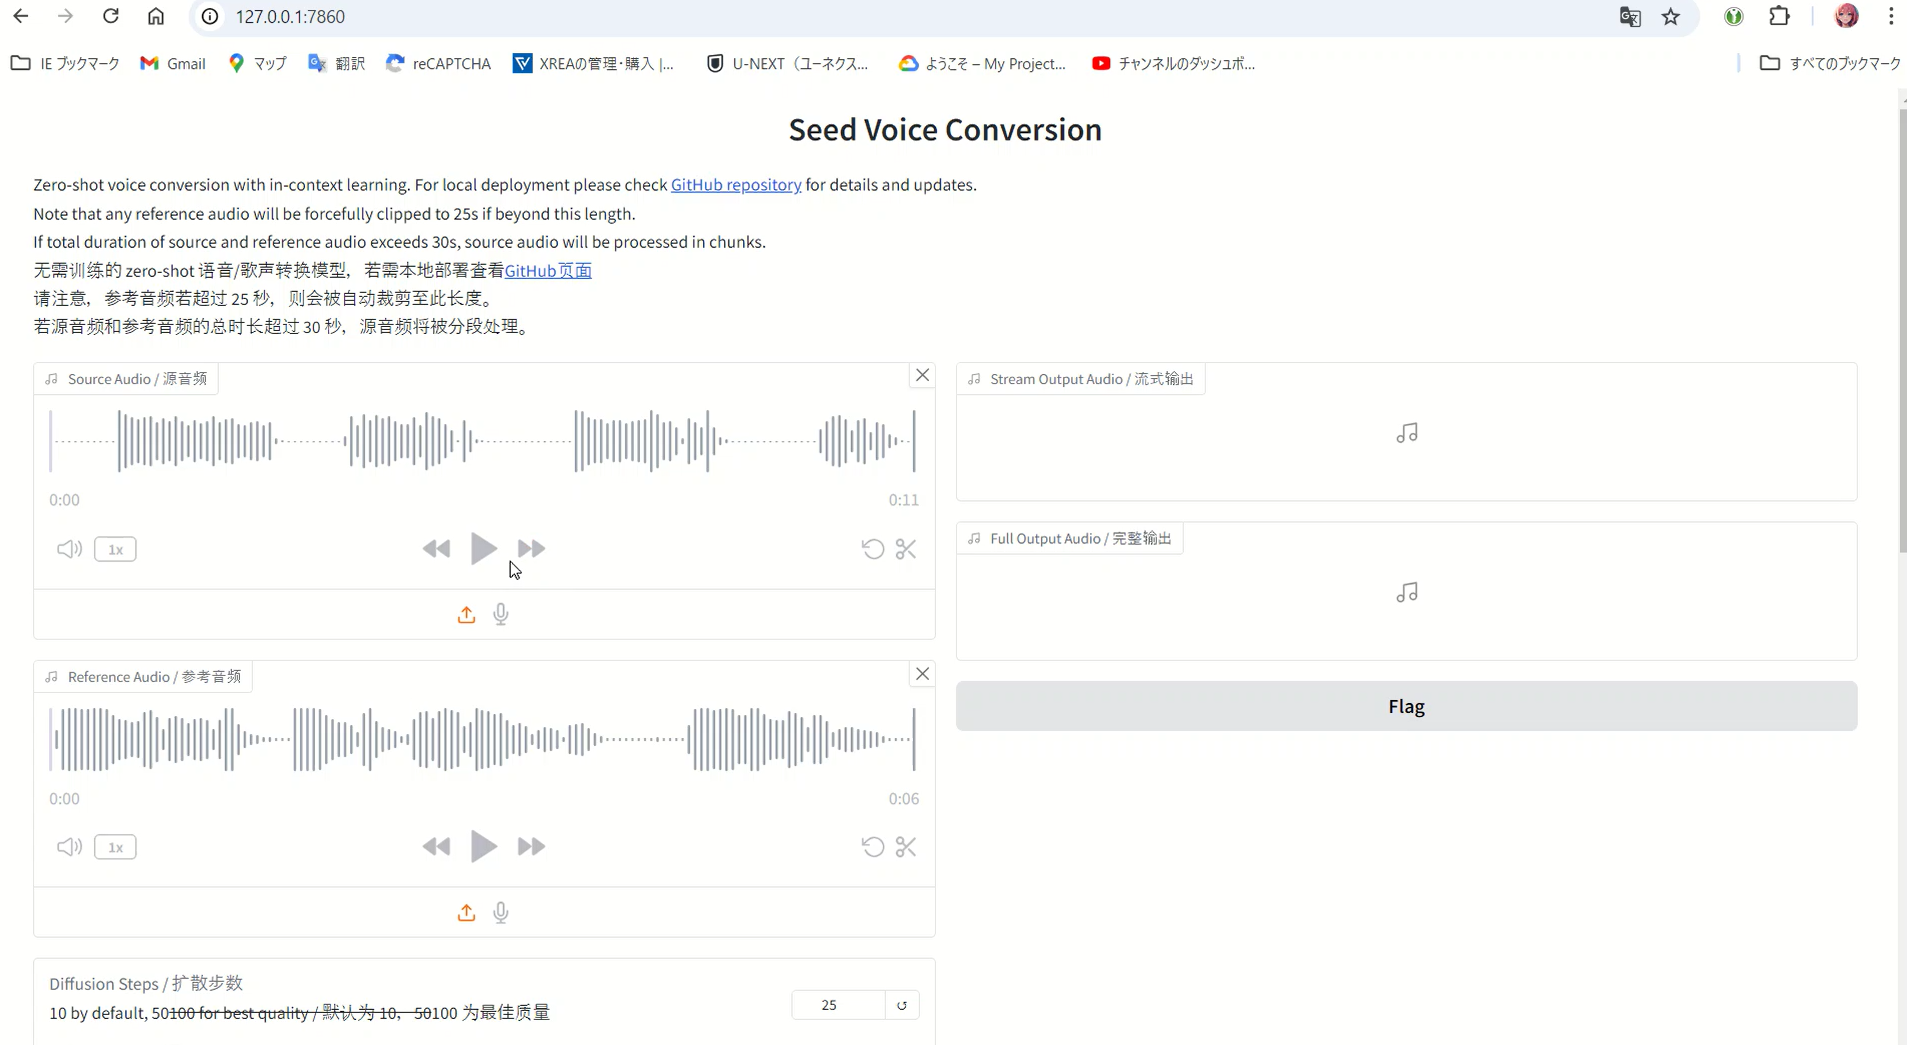
Using the Web Interface
Starting Gradio (V2 Interface)
Launch the enhanced web interface:
python app.py --enable-v2
The first launch takes time as it downloads models – perfect opportunity for a coffee break!
Accessing the Interface
Once loaded, access at:
http://127.0.0.1:7860/
The new interface features tabs for both V1 and V2 models, allowing you to choose based on your needs.
V2 Model Parameters Explained
Core Parameters
Understanding these parameters is crucial for optimal results:
Diffusion Steps (1-200, default: 30)
- 25-30: Quick conversions, good quality
- 50-100: Best for singing voice conversion
- 100+: Maximum quality but slower
Length Adjust (0.5-2.0, default: 1.0)
- Controls output audio duration
- 1.0 maintains original length
- Useful for matching speech pace
Intelligibility CFG Rate (0.0-1.0, default: 0.7)
- Controls linguistic content clarity
- Higher values preserve original speech patterns
- Lower values allow more voice characteristic transfer
Similarity CFG Rate (0.0-1.0, default: 0.7)
- Controls voice similarity to reference
- Higher values = closer to reference voice
- Balance with intelligibility for best results
Advanced Style Transfer Parameters
Convert Style Checkbox
- Enable for emotion/accent/prosody transfer
- Disable for pure timbre conversion (V1-like behavior)
Top-p (0.5-1.0, default: 0.9)
- Controls AR model output diversity
- Lower values = more conservative
- Higher values = more variation
Temperature (0.7-1.2, default: 1.0)
- Controls randomness in style transfer
- Lower = more deterministic
- Higher = more creative variations
Repetition Penalty (1.0-1.5, default: 1.0)
- Prevents repetitive patterns in output
- Useful for longer conversions
Real-World Performance Tips
Optimal Settings by Use Case
After extensive testing, here are my recommended configurations:
For Standard Voice Conversion
settings = {
    'diffusion_steps': 25,
    'length_adjust': 1.0,
    'intelligibility_cfg_rate': 0.7,
    'similarity_cfg_rate': 0.7,
    'convert_style': False
}
For Emotional Voice Conversion
settings = {
    'diffusion_steps': 30,
    'intelligibility_cfg_rate': 0.6,
    'similarity_cfg_rate': 0.8,
    'convert_style': True,
    'temperature': 0.9
}
For Singing Voice Conversion
settings = {
    'diffusion_steps': 50,
    'f0_condition': True,
    'auto_f0_adjust': False,
    'pitch_shift': 0  # Adjust for key matching
}
Memory Management Strategies
During intensive testing, I developed these memory optimization techniques:
import torch
import gc

# Clear GPU memory between conversions
def clear_memory():
    gc.collect()
    if torch.cuda.is_available():
        torch.cuda.empty_cache()
        print(f"GPU Memory: {torch.cuda.memory_allocated() / 1024**2:.2f} MB")
Processing Longer Files
The V2 model handles long files better through automatic chunking:
- Files over 30 seconds are automatically split
- Each chunk is processed with overlap for continuity
- Results are seamlessly concatenated
For manual control:
# Adjust chunk size in the code
max_context_window = sr // hop_length * 30  # 30 seconds default
Advanced Features and Techniques
Real-Time Voice Conversion
Seed-VC now supports real-time processing:
python real-time-gui.py --checkpoint <path> --config <path>
Performance requirements:
- NVIDIA RTX 3060 or better recommended
- Inference time must be less than block time
- Adjust parameters based on your GPU
Fine-Tuning on Custom Data
For even better results with specific voices, you can fine-tune the model:
# Prepare dataset (audio files + transcriptions)
python preprocess.py --dataset-dir ./data

# Train V2 model
accelerate launch train_v2.py \
    --dataset-dir ./data \
    --run-name my-voice \
    --batch-size 2 \
    --max-steps 1000 \
    --save-every 500
Training tips:
- Use high-quality recordings (16kHz minimum)
- Include diverse speech samples
- 10-30 minutes of audio typically sufficient
Anonymization Feature
V2 introduces voice anonymization:
# Enable anonymization mode
anonymization_only = True
# This ignores reference audio and converts to an "average" voice
Useful for:
- Privacy protection in recordings
- Creating neutral voice samples
- Research applications
Troubleshooting Common Issues
GPU Memory Errors
If encountering out-of-memory errors:
- Reduce batch size
- Lower diffusion steps
- Enable CPU offloading:
device = "cuda" if torch.cuda.is_available() else "cpu"
dtype = torch.float16 if device == "cuda" else torch.float32
Model Download Issues
If models fail to download:
- Check internet connection
- Use HuggingFace mirror:
export HF_ENDPOINT=https://hf-mirror.com
- Download manually and specify paths:
python app_vc_v2.py \
    --cfm-checkpoint-path ./models/cfm_model.pth \
    --ar-checkpoint-path ./models/ar_model.pth
Performance Issues
For slow processing:
- Verify CUDA installation:
import torch
print(torch.cuda.is_available())
print(torch.cuda.get_device_name(0))
- Enable compilation:
python app.py --enable-v2 --compile
- Check GPU utilization:
nvidia-smi -l 1 # Monitor GPU usage
Platform-Specific Considerations
Windows Setup
Beyond Visual C++ Build Tools, Windows users should:
- Enable long path support:
# Run as Administrator
New-ItemProperty -Path "HKLM:\SYSTEM\CurrentControlSet\Control\FileSystem" `
    -Name "LongPathsEnabled" -Value 1 -PropertyType DWORD -Force
- Install Windows-specific optimizations:
pip install triton-windows
Linux/WSL Setup
For Linux and WSL users:
# Install system dependencies
sudo apt update
sudo apt install build-essential
sudo apt install libssl-dev libffi-dev python3-dev
sudo apt install ffmpeg  # For audio processing
WSL-specific considerations:
- GPU passthrough requires WSL2 with CUDA support
- May need to install CUDA toolkit separately
- Performance slightly lower than native Linux
macOS Setup (Apple Silicon)
For M1/M2/M3 Macs:
# Use MPS (Metal Performance Shaders) backend
export PYTORCH_ENABLE_MPS_FALLBACK=1
Note: MPS support is experimental but functional for inference.
Comparing Seed-VC Versions
V1 vs V2 Feature Comparison
| Feature | V1 | V2 |
|---|---|---|
| Voice Conversion | ✅ | ✅ |
| Singing Voice | ✅ | ✅ |
| Style Transfer | ❌ | ✅ |
| Emotion Transfer | ❌ | ✅ |
| Accent Conversion | ❌ | ✅ |
| Real-time Support | ✅ | ✅ |
| Streaming | Limited | ✅ |
| Speed | Good | Excellent (with –compile) |
| Memory Usage | Lower | Higher |
When to Use Each Version
Use V1 when:
- Limited GPU memory (< 6GB)
- Simple voice conversion needed
- Stability is priority
Use V2 when:
- Need style/emotion transfer
- Have modern GPU (8GB+ VRAM)
- Want best quality output
Best Practices and Pro Tips
Audio Preparation
For optimal results:
- Reference Audio Quality
- Use clean recordings without background noise
- 1-30 seconds duration (automatically clipped if longer)
- Consistent volume levels
- Sample rate of at least 16kHz
- Source Audio Considerations
- Clear articulation improves conversion
- Avoid overlapping speech
- Remove background music when possible
Batch Processing Workflow
For processing multiple files efficiently:
import os
from pathlib import Path

def batch_convert(source_dir, reference_audio, output_dir):
    source_files = Path(source_dir).glob("*.wav")

    for source in source_files:
        output = Path(output_dir) / f"converted_{source.name}"

        # Process each file
        process_audio(
            source=str(source),
            reference=reference_audio,
            output=str(output),
            diffusion_steps=25
        )

        # Clear memory between files
        clear_memory()
Quality Optimization Checklist
Before processing:
- ✅ Clean audio files
- ✅ Correct CUDA version
- ✅ Sufficient GPU memory
- ✅ Optimal parameters selected
- ✅ Virtual environment activated
- ✅ Models downloaded
Advanced Configuration Examples
Custom Pipeline for Podcast Production
# Settings for podcast voice conversion
podcast_settings = {
    'diffusion_steps': 30,
    'length_adjust': 1.0,
    'intelligibility_cfg_rate': 0.8,  # Higher for clarity
    'similarity_cfg_rate': 0.6,       # Lower for naturalness
    'convert_style': True,
    'temperature': 0.8,
    'top_p': 0.9
}
Character Voice for Animation
# Settings for animated character voices
character_settings = {
    'diffusion_steps': 40,
    'intelligibility_cfg_rate': 0.5,  # Allow more character
    'similarity_cfg_rate': 0.9,       # Strong character voice
    'convert_style': True,
    'temperature': 1.1,               # More expressive
    'pitch_shift': 2                  # Adjust for character
}
Future Developments and Roadmap
Expected in 2025
Based on the development trajectory:
- Enhanced Model Architectures
- Improved CFM models with better quality
- Faster AR inference
- Reduced memory requirements
- New Features
- Multi-speaker conversion
- Language-agnostic conversion
- Better singing voice handling
- Performance Improvements
- Native CUDA 13.0 support
- Optimized memory management
- Faster model loading
Conclusion
Seed-VC has evolved significantly since its initial release, with V2 bringing remarkable improvements in both functionality and performance. The journey from setup to mastery involves understanding not just the technical requirements but also the nuances of each parameter.
Key Takeaways
- Environment Setup is Critical
- Python 3.10 remains the sweet spot
- Proper CUDA configuration dramatically improves performance
- Virtual environments prevent dependency conflicts
- V2 Models Are Game-Changers
- Style transfer opens new creative possibilities
- Performance improvements with –compile are substantial
- Streaming support handles long-form content efficiently
- Parameter Tuning Matters
- Different use cases require different settings
- Balance between quality and speed is achievable
- Experimentation leads to optimal results
Final Recommendations
- Start with V2: Unless you have specific constraints, V2 offers superior features
- Invest in Proper Setup: Time spent on correct CUDA configuration pays off
- Document Your Settings: Keep track of what works for your specific use cases
- Stay Updated: The project is actively developed with regular improvements
Resources and Links
Note on CUDA 12.6 and Recent Updates
Seed-VC has undergone major upgrades to support CUDA 12.6 and newer versions. After updating via git pull, you may need to:
- Update your PyTorch installation to match your CUDA version
- Clear old model caches
- Reinstall requirements with the updated specifications
The improvements in performance and compatibility make these updates worthwhile, even if they require some reconfiguration of your existing setup.
Happy voice converting! The technology has come a long way, and the possibilities are truly exciting. 🎙️✨