Introduction: Why FFmpeg Matters in the Age of AI Music
Many websites explain how to install FFmpeg, but very few really dig into why you need it. In an era where AI tools make music generation more accessible than ever, it’s important to understand the core role FFmpeg plays in processing, converting, and managing various audio files.
In this article, we’ll break down what FFmpeg actually does and why it’s a game-changer, especially for anyone dabbling in AI-driven audio. Then, we’ll focus on the simplest, most foolproof installation methods for Windows users—covering both the regular Windows environment and Windows Subsystem for Linux (WSL). By the end, you’ll know:
- Why FFmpeg is integral to modern music-generation AI tools
- Which version of FFmpeg you need on Windows vs. WSL vs. other platforms
- How to install it step-by-step without getting lost in confusing downloads
- What build options to choose for your specific needs
Along the way, I’ll also share practical tips for beginners so you can avoid the most common pitfalls.
What Is FFmpeg, and Why Do AI Tools Need It?
FFmpeg is a command-line utility that can handle virtually any audio or video format you throw at it—from MP3 and WAV to obscure codecs you’ve never heard of. When an AI system generates music or processes sound, it often needs to read and write files in different formats. That’s where FFmpeg comes in: it acts like a universal translator, ensuring your audio data is in the right format before and after any AI processing.
Key Functions of FFmpeg in AI Music Workflows
| Function | Why It Matters for AI |
|---|---|
| Converting Audio Formats | AI models may output raw audio; FFmpeg turns it into user-friendly files (e.g., MP3, WAV, FLAC). |
| Editing & Trimming | Prepares training data by trimming silence or unwanted sections. |
| Resampling | Ensures consistent sample rates for AI models that require specific audio settings. |
| Metadata Handling | Allows you to embed or read ID3 tags, which can be essential for organizing large datasets. |
| Hardware Acceleration | Enables GPU-accelerated encoding/decoding for faster processing of large audio/video datasets. |
| Streaming Support | Facilitates real-time audio streaming for live AI applications. |
In many AI frameworks—such as those built with Python libraries like pydub, moviepy, or torchaudio—FFmpeg is a required external tool. If it’s missing, the library can’t do basic audio conversions or edits. That’s why so many tutorials simply say “install FFmpeg” without telling you exactly why you’re doing it. But understanding its role helps you troubleshoot issues and choose the right version for your system.
Roadmap for This Article
- Understanding FFmpeg Build Options: Different builds serve different purposes—choosing the right one matters.
- Essential Installation Steps for Windows Users: Where to download the correct files and how to configure your system.
- Installing and Verifying FFmpeg in WSL: A separate environment means a separate installation.
- macOS and Linux Installation: Quick guides for other major platforms.
- Automatic Installation Script (Bonus): A quick solution for those who’d rather let a script handle everything.
- Advanced Topics: GPU acceleration, custom builds, and Docker environments.
By taking a step-by-step approach, you’ll avoid the confusion of downloading source code you don’t need or accidentally messing up your Path environment variable.
Note: If you’re curious about a fast-track solution, we’ll share an automated PowerShell script later in the article. It handles all the tricky parts—downloading and setting up the right binaries—so you don’t have to do everything manually.
Understanding FFmpeg Build Options: Which Version Should You Choose?
Before downloading FFmpeg, it’s crucial to understand the different build options available. Each serves different purposes, and choosing the wrong one can lead to missing features or unnecessary bloat.
Build Types Explained
Static vs. Shared Builds
Static Builds (-static)
- What it is: All libraries are compiled into a single executable file
- Pros:
- No external dependencies needed
- Portable—can be copied to any system and run
- Slightly faster execution (no dynamic linking overhead)
- Cons:
- Larger file size (typically 70-100MB)
- Cannot use external codec libraries
- Best for: Simple deployments, portable applications, Docker containers
Shared Builds (-shared)
- What it is: Libraries are kept as separate DLL/SO files
- Pros:
- Smaller main executable
- Can use external codec libraries
- Updates to libraries don’t require recompiling FFmpeg
- Cons:
- Requires all DLL files to be present
- Slightly slower startup time
- Best for: Development environments, systems where you need codec flexibility
GPL vs. LGPL Licensing
GPL Builds (-gpl)
- Includes: All features including GPL-licensed codecs (x264, x265, etc.)
- Legal consideration: If you distribute software using this build, you may need to open-source your code
- Best for: Personal use, open-source projects, internal tools
LGPL Builds (-lgpl)
- Excludes: GPL-licensed components
- Legal consideration: More permissive for commercial use
- Best for: Commercial applications, proprietary software
Platform-Specific Recommendations
| Use Case | Recommended Build | Why |
|---|---|---|
| AI/ML Development | Windows: win64-gpl-shared | Maximum codec support, development flexibility |
| Production Server | Linux: linux64-gpl-static | No dependency management needed |
| Commercial Software | Any platform: lgpl-static | Legal compliance, easy distribution |
| Media Professional | Windows/Mac: full builds | Includes rare codecs and formats |
| Minimal Setup | Any: essentials builds | Core features only, smaller size |
Hardware Acceleration Options
Modern FFmpeg builds may include hardware acceleration support:
- NVENC/NVDEC (NVIDIA GPUs): For faster encoding/decoding
- QSV (Intel Quick Sync): Intel integrated graphics acceleration
- AMF (AMD): AMD GPU acceleration
- VAAPI (Linux): Generic hardware acceleration API
If you’re processing large amounts of audio/video data for AI training, choosing a build with hardware acceleration support can significantly speed up your workflow.
Choosing the Right FFmpeg Build: Windows vs. WSL vs. Other Platforms
When installing FFmpeg, your approach depends heavily on your operating system and development environment. Each platform has its own best practices and gotchas.
Windows Environment
Why This Matters
If you’re working on Windows-native applications—like certain DAWs, audio editors, or AI tools—you’ll need the Windows build of FFmpeg.
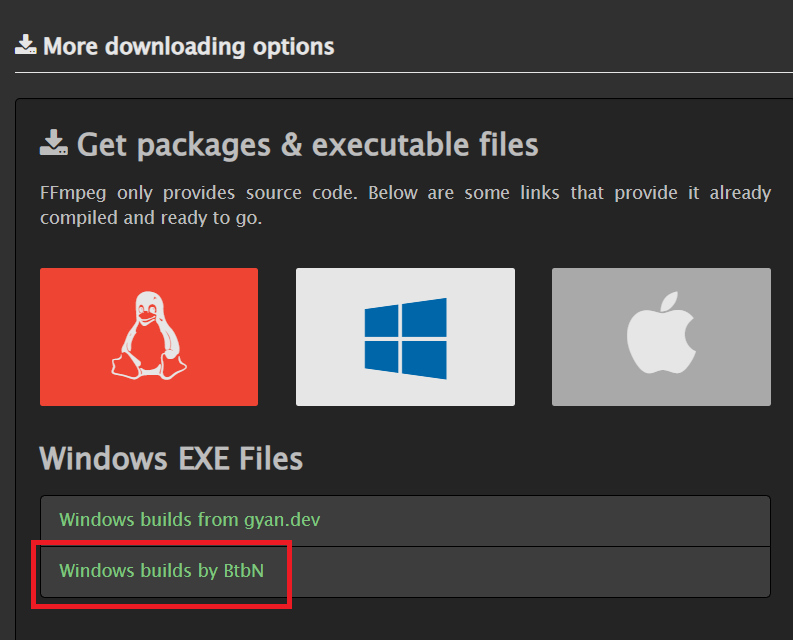
Recommended Sources (2025)
- BtbN GitHub Builds (Recommended)
- URL:
github.com/BtbN/FFmpeg-Builds - Updated regularly with latest FFmpeg versions
- Offers multiple build configurations
- Includes both shared and static builds
- URL:
- gyan.dev Builds (Alternative)
- URL:
www.gyan.dev/ffmpeg/builds/ - Comprehensive full builds with all codecs
- Good documentation
- May be slightly behind latest releases
- URL:
- Official FFmpeg.org
- Links to approved third-party builds
- Always check for the latest recommended builders
WSL Environment
Why This Matters
If you plan to develop or run AI projects in WSL (Ubuntu, for example), you’ll need the Linux build inside that environment. Installing the Windows version won’t automatically grant FFmpeg access within WSL.
Installation Methods
- Package Manager (Easiest)
sudo apt update && sudo apt install ffmpeg - Snap Package (Latest version)
sudo snap install ffmpeg - Manual Compilation (Maximum control)
- For specific codec support or optimization flags
macOS Installation
Methods Available
- Homebrew (Recommended)
brew install ffmpeg- For specific options:
brew install ffmpeg --with-libvpx --with-libvorbis
- For specific options:
- MacPorts
sudo port install ffmpeg +gpl +postproc +lame +x264 +x265 - Pre-built Binaries
- Available from evermeet.cx/ffmpeg/
- Good for users without Homebrew
Linux Distributions
Ubuntu/Debian
sudo apt update
sudo apt install ffmpeg
Fedora/RHEL/CentOS
sudo dnf install ffmpeg
Arch Linux
sudo pacman -S ffmpeg
Alpine (Docker containers)
apk add --no-cache ffmpeg
Docker Environments
For AI applications running in containers:
# Ubuntu-based
FROM ubuntu:22.04
RUN apt-get update && apt-get install -y ffmpeg

# Alpine-based (smaller image)
FROM alpine:latest
RUN apk add --no-cache ffmpeg

# Custom build for specific needs
FROM ubuntu:22.04 as builder
RUN apt-get update && apt-get install -y build-essential git
RUN git clone https://github.com/FFmpeg/FFmpeg.git
# ... compilation steps
Common Misconceptions
- Some people assume installing FFmpeg on Windows automatically makes it available in WSL. In reality, WSL operates like a standalone Linux environment, so you’ll have to install FFmpeg there separately.
- Docker containers need their own FFmpeg installation, even if the host system has it installed.
- The version from your OS package manager might be outdated—check if you need the latest features.
Preparing for Installation: What You’ll Need
Before diving into the actual steps, it’s helpful to make sure you have all the pieces in place. While FFmpeg installation is usually straightforward, a few extra considerations can save you a lot of time and frustration:
System Requirements Check
- Verify Your Operating System
- Windows: Windows 10 version 1903+ or Windows 11 (for full feature support)
- macOS: macOS 10.15 (Catalina) or later
- Linux: Any modern distribution with glibc 2.17+
- WSL: WSL 2 recommended for better performance
- Check Architecture
# Windows (PowerShell)[System.Environment]::Is64BitOperatingSystem
# Linux/macOS/WSLuname -m- Ensure you download the matching architecture (x64, ARM64, etc.)
- Storage Space
- Static builds: ~100MB
- Shared builds: ~30MB + dependencies
- Development builds with debugging symbols: ~500MB
Understanding Your Use Case
Choose your installation method based on your needs:
| Use Case | Recommended Approach |
|---|---|
| AI/ML with Python | System package manager or conda |
| Video Editing | Full static build with all codecs |
| Web Development | Docker container or minimal build |
| Cross-platform Development | Multiple installations or Docker |
Pitfalls to Avoid
- Grabbing the Source Code by Accident
- The official FFmpeg site often features a prominent “Download Source Code” link
- Look for “Windows Builds” or “Get packages & executable files” instead
- Source code requires compilation—not for beginners!
- Version Mismatches
- Some AI libraries require specific FFmpeg versions
- Check requirements:
pip show <library>or check documentation - Consider using conda environments for version management
- Permission Issues
- Windows: May need administrator rights to modify PATH
- Linux/macOS: Use
sudofor system-wide installation - Corporate environments: Check with IT before installation
- Codec Patent Concerns
- Some codecs (H.264, H.265) have patent implications
- For commercial use, consider LGPL builds or license fees
- Open-source alternatives: VP9, AV1, Opus
Pre-Installation Checklist
- [ ] Verified OS version and architecture
- [ ] Checked available disk space
- [ ] Identified specific codec requirements
- [ ] Confirmed admin/sudo access if needed
- [ ] Backed up existing FFmpeg installation (if any)
- [ ] Noted any firewall/proxy settings for downloads
Environment-Specific Preparations
Python Environments
If using with Python AI libraries:
# Check current environment
conda info --envs  # for Conda
pip list | grep -i ffmpeg  # Check for ffmpeg-python

# Create dedicated environment (recommended)
conda create -n ai_audio python=3.10
conda activate ai_audio
Node.js Projects
# Check if fluent-ffmpeg is installed
npm list fluent-ffmpeg

# Prepare for installation
npm init -y  # if starting fresh
Docker Preparation
# Check Docker installation
docker --version

# Pull base image in advance
docker pull ubuntu:22.04  # or your preferred base
Manual Installation on Windows: Step by Step
Method 1: BtbN GitHub Builds (Recommended for 2025)
- Navigate to the Release Page
- Go to:
https://github.com/BtbN/FFmpeg-Builds/releases - Look for the “latest” release at the top
- Go to:
- Choose Your Build
- For most users:
ffmpeg-master-latest-win64-gpl.zip(static) or - For development:
ffmpeg-master-latest-win64-gpl-shared.zip(shared) - For commercial use: Look for
lgplvariants
- For most users:
- Download and Extract
- Download your chosen ZIP file
- Right-click → “Extract All” to
C:\Program Files\ffmpeg - You should see folders:
bin,doc, andpresets
Method 2: Using Windows Package Managers
Winget (Windows 11/10 version 1809+)
# Install FFmpeg directly
winget install ffmpeg

# Or search first
winget search ffmpeg
winget install Gyan.FFmpeg
Chocolatey
# Install Chocolatey first if needed
# Then:
choco install ffmpeg

# For specific version
choco install ffmpeg --version=6.1
Scoop
# Install Scoop first if needed
# Then:
scoop install ffmpeg

# For full build with all codecs
scoop install ffmpeg-full
Setting Up the PATH Variable
- Open System Properties
- Press
Windows + X→ “System” - Click “Advanced system settings”
- Click “Environment Variables”
- Press
- Edit PATH Variable
- Under “System variables”, find “Path”
- Click “Edit” → “New”
- Add:
C:\Program Files\ffmpeg\bin - Click “OK” on all windows
- Alternative: PowerShell Method
# Run as Administrator
$ffmpegPath = "C:\Program Files\ffmpeg\bin"
$currentPath = [Environment]::GetEnvironmentVariable("Path", "Machine")
if ($currentPath -notlike "*$ffmpegPath*") {
    [Environment]::SetEnvironmentVariable("Path", "$currentPath;$ffmpegPath", "Machine")
    Write-Host "FFmpeg added to PATH"
}
Verification Steps
- Open New Terminal
- Close any open terminals
- Open new PowerShell or Command Prompt
- Test Installation
ffmpeg -versionffprobe -versionffplay -version # May not be included in all builds - Test Basic Functionality
# Create a test fileffmpeg -f lavfi -i testsrc=duration=10:size=320x240:rate=30 test.mp4
# Check fileffprobe test.mp4
Troubleshooting Windows Installation
| Issue | Solution |
|---|---|
| “not recognized as command” | Restart terminal, check PATH spelling |
| Missing DLL errors | Install Visual C++ Redistributables |
| Access denied | Run as administrator, check antivirus |
| Version conflicts | Remove old FFmpeg installations first |
| Slow performance | Consider hardware-accelerated builds |
Automatic Installation with PowerShell: A Hassle-Free Approach
Enhanced Installation Script
Here’s an improved PowerShell script that handles various scenarios and includes error checking:
##############################################################################
# install_ffmpeg_advanced.ps1
#  - Downloads FFmpeg from GitHub (BtbN/FFmpeg-Builds)
#  - Supports multiple build types
#  - Handles PATH updates safely
#  - Includes rollback on failure
#  - Requires Administrator privileges
##############################################################################

param(
    [Parameter()]
    [ValidateSet('shared', 'static', 'full')]
    [string]$BuildType = 'shared',

    [Parameter()]
    [ValidateSet('gpl', 'lgpl')]
    [string]$License = 'gpl',

    [Parameter()]
    [string]$InstallPath = "$env:ProgramFiles\ffmpeg",

    [Parameter()]
    [switch]$Force
)

# === Configuration ===
$builds = @{
    'shared-gpl' = "ffmpeg-master-latest-win64-gpl-shared.zip"
    'static-gpl' = "ffmpeg-master-latest-win64-gpl.zip"
    'shared-lgpl' = "ffmpeg-master-latest-win64-lgpl-shared.zip"
    'static-lgpl' = "ffmpeg-master-latest-win64-lgpl.zip"
    'full' = "ffmpeg-master-latest-win64-gpl-shared.zip"
}

$buildKey = "$BuildType-$License"
if ($BuildType -eq 'full') { $buildKey = 'full' }

$fileName = $builds[$buildKey]
$baseUrl = "https://github.com/BtbN/FFmpeg-Builds/releases/download/latest"
$ffmpegUrl = "$baseUrl/$fileName"

$tempZip = Join-Path $env:TEMP "ffmpeg_$([guid]::NewGuid()).zip"
$tempExtractDir = Join-Path $env:TEMP "ffmpeg_extract_$([guid]::NewGuid())"
$backupDir = "$InstallPath.backup"

Write-Host ""
Write-Host "=== FFmpeg Advanced Installation Script ===" -ForegroundColor Cyan
Write-Host "Build Type: $BuildType" -ForegroundColor Yellow
Write-Host "License: $License" -ForegroundColor Yellow
Write-Host "Install Path: $InstallPath" -ForegroundColor Yellow
Write-Host ""

# Check if running as administrator
if (-NOT ([Security.Principal.WindowsPrincipal] [Security.Principal.WindowsIdentity]::GetCurrent()).IsInRole([Security.Principal.WindowsBuiltInRole] "Administrator")) {
    Write-Error "This script must be run as Administrator. Exiting..."
    exit 1
}

# ----------------------------------------------------------------------------
# 1) Backup existing installation
# ----------------------------------------------------------------------------
if (Test-Path $InstallPath) {
    if ($Force) {
        Write-Host "Force flag set. Removing existing installation..." -ForegroundColor Yellow
        Remove-Item -Path $InstallPath -Recurse -Force
    } else {
        Write-Host "Existing installation found. Creating backup..." -ForegroundColor Yellow
        if (Test-Path $backupDir) {
            Remove-Item -Path $backupDir -Recurse -Force
        }
        Move-Item -Path $InstallPath -Destination $backupDir
        Write-Host "Backup created at: $backupDir" -ForegroundColor Green
    }
}

# ----------------------------------------------------------------------------
# 2) Download FFmpeg
# ----------------------------------------------------------------------------
try {
    Write-Host "Downloading FFmpeg..." -ForegroundColor Cyan
    Write-Host "URL: $ffmpegUrl" -ForegroundColor Gray

    $ProgressPreference = 'SilentlyContinue'  # Speed up download
    Invoke-WebRequest -Uri $ffmpegUrl -OutFile $tempZip -UseBasicParsing
    $ProgressPreference = 'Continue'

    $fileSize = (Get-Item $tempZip).Length / 1MB
    Write-Host "Download completed: $([math]::Round($fileSize, 2)) MB" -ForegroundColor Green
}
catch {
    Write-Error "Failed to download FFmpeg. Error: $($_.Exception.Message)"

    # Restore backup if it exists
    if (Test-Path $backupDir) {
        Write-Host "Restoring backup..." -ForegroundColor Yellow
        Move-Item -Path $backupDir -Destination $InstallPath
    }
    exit 1
}

# ----------------------------------------------------------------------------
# 3) Extract and install
# ----------------------------------------------------------------------------
try {
    Write-Host "Extracting FFmpeg..." -ForegroundColor Cyan

    # Create extraction directory
    New-Item -Path $tempExtractDir -ItemType Directory -Force | Out-Null

    # Extract ZIP
    Add-Type -AssemblyName System.IO.Compression.FileSystem
    [System.IO.Compression.ZipFile]::ExtractToDirectory($tempZip, $tempExtractDir)

    # Find the extracted folder (usually has version in name)
    $extractedFolder = Get-ChildItem -Path $tempExtractDir -Directory | Select-Object -First 1

    if (-not $extractedFolder) {
        throw "No folder found in extracted archive"
    }

    # Move to final location
    Write-Host "Installing to: $InstallPath" -ForegroundColor Cyan
    New-Item -Path $InstallPath -ItemType Directory -Force | Out-Null

    Get-ChildItem -Path $extractedFolder.FullName |
        Move-Item -Destination $InstallPath -Force

    Write-Host "Installation completed" -ForegroundColor Green
}
catch {
    Write-Error "Failed to extract/install FFmpeg. Error: $($_.Exception.Message)"

    # Cleanup and restore backup
    if (Test-Path $InstallPath) {
        Remove-Item -Path $InstallPath -Recurse -Force -ErrorAction SilentlyContinue
    }
    if (Test-Path $backupDir) {
        Write-Host "Restoring backup..." -ForegroundColor Yellow
        Move-Item -Path $backupDir -Destination $InstallPath
    }
    exit 1
}

# ----------------------------------------------------------------------------
# 4) Update PATH
# ----------------------------------------------------------------------------
try {
    $binPath = Join-Path $InstallPath "bin"

    if (-not (Test-Path $binPath)) {
        throw "FFmpeg bin directory not found at: $binPath"
    }

    Write-Host "Updating system PATH..." -ForegroundColor Cyan

    $machinePath = [Environment]::GetEnvironmentVariable("Path", "Machine")
    $pathArray = $machinePath -split ';' | Where-Object { $_ -ne '' }

    # Remove any existing FFmpeg paths
    $pathArray = $pathArray | Where-Object { $_ -notlike '*ffmpeg*' }

    # Add new FFmpeg path
    $pathArray += $binPath

    $newPath = $pathArray -join ';'
    [Environment]::SetEnvironmentVariable("Path", $newPath, "Machine")

    Write-Host "PATH updated successfully" -ForegroundColor Green
}
catch {
    Write-Error "Failed to update PATH. Error: $($_.Exception.Message)"
    Write-Host "You may need to add this manually to PATH: $binPath" -ForegroundColor Yellow
}

# ----------------------------------------------------------------------------
# 5) Cleanup
# ----------------------------------------------------------------------------
Write-Host "Cleaning up temporary files..." -ForegroundColor Cyan

Remove-Item -Path $tempZip -Force -ErrorAction SilentlyContinue
Remove-Item -Path $tempExtractDir -Recurse -Force -ErrorAction SilentlyContinue

if (Test-Path $backupDir) {
    Write-Host ""
    Write-Host "Previous version backed up at: $backupDir" -ForegroundColor Yellow
    Write-Host "To remove backup, run: Remove-Item '$backupDir' -Recurse -Force" -ForegroundColor Gray
}

# ----------------------------------------------------------------------------
# 6) Verification
# ----------------------------------------------------------------------------
Write-Host ""
Write-Host "=== Verifying Installation ===" -ForegroundColor Cyan

# Refresh PATH for current session
$env:Path = [System.Environment]::GetEnvironmentVariable("Path", "Machine") + ";" + [System.Environment]::GetEnvironmentVariable("Path", "User")

try {
    $ffmpegVersion = & "$binPath\ffmpeg.exe" -version 2>&1 | Select-Object -First 1
    Write-Host "FFmpeg installed: $ffmpegVersion" -ForegroundColor Green

    # Test all components
    $components = @('ffmpeg', 'ffprobe')
    if (Test-Path "$binPath\ffplay.exe") {
        $components += 'ffplay'
    }

    foreach ($component in $components) {
        if (Test-Path "$binPath\$component.exe") {
            Write-Host "✓ $component.exe found" -ForegroundColor Green
        } else {
            Write-Host "✗ $component.exe not found" -ForegroundColor Red
        }
    }
}
catch {
    Write-Warning "Could not verify FFmpeg installation. Please open a new terminal and try: ffmpeg -version"
}

Write-Host ""
Write-Host "=== Installation Complete ===" -ForegroundColor Green
Write-Host "Please restart your terminal or IDE to use FFmpeg" -ForegroundColor Yellow
Write-Host ""

# Optional: Show usage examples
Write-Host "Quick test commands:" -ForegroundColor Cyan
Write-Host "  ffmpeg -version" -ForegroundColor Gray
Write-Host "  ffmpeg -encoders" -ForegroundColor Gray
Write-Host "  ffmpeg -decoders" -ForegroundColor Gray
Write-Host ""
Using the Script
- Save the Script Save as
install_ffmpeg_advanced.ps1 - Run with Options
# Run as Administrator
# Default installation (shared, GPL).\install_ffmpeg_advanced.ps1
# Static build for distribution.\install_ffmpeg_advanced.ps1 -BuildType static
# Commercial-friendly LGPL build.\install_ffmpeg_advanced.ps1 -License lgpl
# Custom installation path.\install_ffmpeg_advanced.ps1 -InstallPath "D:\Tools\ffmpeg"
# Force reinstall (no backup).\install_ffmpeg_advanced.ps1 -Force - Execution Policy If you get execution policy errors:
# Temporary bypass (current session only)Set-ExecutionPolicy Bypass -Scope Process -Force
# Or sign the script for permanent useSet-ExecutionPolicy RemoteSigned -Scope CurrentUser
Using FFmpeg in WSL (Windows Subsystem for Linux)
WSL 2 vs WSL 1
First, check your WSL version:
wsl --list --verbose
WSL 2 is recommended for better performance and full system call compatibility.
Installation Methods
Method 1: Distribution Package Manager
Ubuntu/Debian:
# Update package list
sudo apt update

# Install FFmpeg
sudo apt install ffmpeg

# For specific version
sudo apt install ffmpeg=7:4.4.2-0ubuntu0.22.04.1
Fedora:
sudo dnf install ffmpeg
openSUSE:
sudo zypper install ffmpeg
Method 2: Snap Package (Latest Version)
# Install snapd if not present
sudo apt update
sudo apt install snapd

# Install FFmpeg via snap
sudo snap install ffmpeg

# Add snap to PATH if needed
echo 'export PATH=$PATH:/snap/bin' >> ~/.bashrc
source ~/.bashrc
Method 3: Compile from Source (Maximum Control)
# Install dependencies
sudo apt update
sudo apt install -y \
  build-essential \
  git \
  pkg-config \
  yasm \
  libx264-dev \
  libx265-dev \
  libvpx-dev \
  libfdk-aac-dev \
  libmp3lame-dev \
  libopus-dev

# Clone and compile
git clone https://github.com/FFmpeg/FFmpeg.git
cd FFmpeg
./configure \
  --enable-gpl \
  --enable-libx264 \
  --enable-libx265 \
  --enable-libvpx \
  --enable-libfdk-aac \
  --enable-libmp3lame \
  --enable-libopus \
  --enable-nonfree

make -j$(nproc)
sudo make install
Accessing Windows Files from WSL
FFmpeg in WSL can process files from Windows:
# Windows paths are mounted under /mnt/
ffmpeg -i /mnt/c/Users/YourName/Videos/input.mp4 output.mp4

# Or use Windows path directly with wslpath
ffmpeg -i "$(wslpath 'C:\Users\YourName\Videos\input.mp4')" output.mp4
Performance Optimization
- Use WSL 2 for Better I/O
wsl --set-version Ubuntu 2 - Store Files in Linux Filesystem
- Files in
/home/are faster than/mnt/c/ - Copy large files to Linux filesystem before processing
- Files in
- Hardware Acceleration WSL 2 supports GPU acceleration:
# Check if GPU is availablenvidia-smi# For NVIDIA
# Use hardware encodingffmpeg -i input.mp4 -c:v h264_nvenc output.mp4
Common WSL-Specific Issues
| Issue | Solution |
|---|---|
| Slow file access on /mnt/c | Copy files to Linux filesystem first |
| Permission denied | Use sudo or fix file permissions |
| Command not found after install | Run hash -r or restart terminal |
| Different versions in Windows/WSL | This is normal—they’re separate environments |
| Audio playback issues | WSL has limited audio support; use Windows FFmpeg for audio preview |
Advanced Topics and Best Practices
GPU Hardware Acceleration
NVIDIA (NVENC/NVDEC)
# Check NVENC support
ffmpeg -encoders | grep nvenc

# Example encoding with NVENC
ffmpeg -i input.mp4 -c:v h264_nvenc -preset fast -b:v 5M output.mp4

# Multiple GPU selection
ffmpeg -hwaccel cuda -hwaccel_device 0 -i input.mp4 -c:v h264_nvenc output.mp4
Intel Quick Sync (QSV)
# Check QSV support
ffmpeg -encoders | grep qsv

# Example with QSV
ffmpeg -init_hw_device qsv=hw -filter_hw_device hw -i input.mp4 -vf hwupload=extra_hw_frames=64,format=qsv -c:v h264_qsv output.mp4
AMD (AMF)
# Check AMF support
ffmpeg -encoders | grep amf

# Example with AMF
ffmpeg -i input.mp4 -c:v h264_amf -quality balanced -b:v 5M output.mp4
Docker Integration
Basic Dockerfile
# Minimal FFmpeg container
FROM alpine:latest
RUN apk add --no-cache ffmpeg
ENTRYPOINT ["ffmpeg"]

# Build and run
# docker build -t my-ffmpeg .
# docker run --rm -v $(pwd):/work my-ffmpeg -i /work/input.mp4 /work/output.mp4
Advanced Dockerfile with GPU Support
# NVIDIA GPU support
FROM nvidia/cuda:11.8.0-base-ubuntu22.04
RUN apt-get update && apt-get install -y ffmpeg
ENV NVIDIA_DRIVER_CAPABILITIES video,compute,utility
ENTRYPOINT ["ffmpeg"]

# Run with GPU
# docker run --rm --gpus all -v $(pwd):/work my-ffmpeg-gpu -hwaccel cuda -i /work/input.mp4 -c:v h264_nvenc /work/output.mp4
Python Integration
Using ffmpeg-python
import ffmpeg

# Install: pip install ffmpeg-python

# Basic conversion
stream = ffmpeg.input('input.mp4')
stream = ffmpeg.output(stream, 'output.mkv')
ffmpeg.run(stream)

# Complex filtering
(
    ffmpeg
    .input('input.mp4')
    .filter('scale', 1280, 720)
    .filter('fps', fps=30)
    .output('output.mp4', vcodec='libx264', crf=23)
    .overwrite_output()
    .run()
)
Using PyDub for Audio
from pydub import AudioSegment
from pydub.playback import play

# Requires FFmpeg to be installed
audio = AudioSegment.from_mp3("input.mp3")
audio = audio + 6  # Increase volume by 6dB
audio.export("output.wav", format="wav")
Performance Optimization Tips
- Multi-threading
# Use all CPU coresffmpeg -i input.mp4 -threads 0 output.mp4
# Specify thread countffmpeg -i input.mp4 -threads 8 output.mp4 - Preset Selection
# Faster encoding (lower quality)ffmpeg -i input.mp4 -preset ultrafast output.mp4
# Slower encoding (higher quality)ffmpeg -i input.mp4 -preset veryslow output.mp4 - Two-Pass Encoding
# First passffmpeg -i input.mp4 -c:v libx264 -b:v 2M -pass 1 -an -f null /dev/null
# Second passffmpeg -i input.mp4 -c:v libx264 -b:v 2M -pass 2 -c:a aac output.mp4
Common AI/ML Workflows
Preparing Audio for AI Training
# Convert to consistent format
ffmpeg -i input.mp3 -ar 22050 -ac 1 -c:a pcm_s16le output.wav

# Batch conversion
for file in *.mp3; do
    ffmpeg -i "$file" -ar 22050 -ac 1 "${file%.mp3}.wav"
done

# Extract segments
ffmpeg -i input.wav -ss 00:00:10 -t 00:00:30 -c copy segment.wav
Video Dataset Preparation
# Extract frames
ffmpeg -i video.mp4 -r 1 frame_%04d.png

# Resize for training
ffmpeg -i input.mp4 -vf scale=224:224 -c:a copy output.mp4

# Convert to specific pixel format
ffmpeg -i input.mp4 -pix_fmt yuv420p output.mp4
Troubleshooting Guide
Debug Commands
# Detailed codec information
ffmpeg -codecs

# Supported formats
ffmpeg -formats

# Available filters
ffmpeg -filters

# Hardware acceleration options
ffmpeg -hwaccels

# Detailed error output
ffmpeg -v debug -i input.mp4 output.mp4
Common Error Solutions
| Error | Cause | Solution |
|---|---|---|
| “Codec not found” | Missing codec support | Use different codec or rebuild with support |
| “Invalid data found” | Corrupted file | Try -err_detect ignore_err |
| “Cannot allocate memory” | Large file/resolution | Reduce resolution or use streaming |
| “Permission denied” | File permissions | Check read/write permissions |
| “Segmentation fault” | Bug or incompatibility | Update FFmpeg or report bug |
Version Management
Checking Version
# Full version info
ffmpeg -version

# Just version number
ffmpeg -version 2>&1 | head -n1

# Check specific component versions
ffmpeg -version | grep configuration
Managing Multiple Versions
Using Docker:
# Different versions in containers
docker run --rm jrottenberg/ffmpeg:4.4-alpine -version
docker run --rm jrottenberg/ffmpeg:5.0-alpine -version
docker run --rm jrottenberg/ffmpeg:6.0-alpine -version
Using Conda:
# Create environments with different versions
conda create -n ffmpeg4 ffmpeg=4.4.2
conda create -n ffmpeg5 ffmpeg=5.1.2
conda create -n ffmpeg6 ffmpeg=6.0

# Activate specific version
conda activate ffmpeg5
Security Considerations
Input Validation
# Limit input duration to prevent DoS
ffmpeg -t 3600 -i untrusted_input.mp4 output.mp4

# Limit output file size
ffmpeg -i input.mp4 -fs 100M output.mp4

# Disable network protocols
ffmpeg -protocols
ffmpeg -protocol_blacklist "http,https,rtp,rtsp,tcp,udp" -i input.mp4 output.mp4
Safe Scripting Practices
import subprocess
import shlex

# BAD - vulnerable to injection
input_file = user_input  # Could be "; rm -rf /"
subprocess.run(f"ffmpeg -i {input_file} output.mp4", shell=True)

# GOOD - properly escaped
input_file = user_input
cmd = ["ffmpeg", "-i", input_file, "output.mp4"]
subprocess.run(cmd, check=True)

# Or use shlex for complex commands
cmd = shlex.split(f"ffmpeg -i {shlex.quote(input_file)} output.mp4")
subprocess.run(cmd, check=True)
Conclusion and Additional Resources
Quick Reference Card
| Task | Command |
|---|---|
| Convert format | ffmpeg -i input.mp4 output.avi |
| Extract audio | ffmpeg -i video.mp4 -vn audio.mp3 |
| Compress video | ffmpeg -i input.mp4 -vcodec libx265 -crf 28 output.mp4 |
| Resize video | ffmpeg -i input.mp4 -vf scale=1280:720 output.mp4 |
| Concatenate files | ffmpeg -f concat -i list.txt -c copy output.mp4 |
| Stream copy | ffmpeg -i input.mp4 -c copy output.mp4 |
| Change framerate | ffmpeg -i input.mp4 -r 30 output.mp4 |
| Extract thumbnail | ffmpeg -i video.mp4 -ss 00:00:10 -vframes 1 thumb.png |
Official Resources
- FFmpeg Documentation: https://ffmpeg.org/documentation.html
- FFmpeg Wiki: https://trac.ffmpeg.org/wiki
- FFmpeg Bug Tracker: https://trac.ffmpeg.org/
- FFmpeg IRC: #ffmpeg on Libera.Chat
Community Resources
- GitHub Builds (BtbN): https://github.com/BtbN/FFmpeg-Builds
- Gyan.dev Builds: https://www.gyan.dev/ffmpeg/builds/
- FFmpeg subreddit: https://reddit.com/r/ffmpeg
- Stack Overflow: https://stackoverflow.com/questions/tagged/ffmpeg
Learning Resources
- FFmpeg Cookbook: Practical recipes for common tasks
- FFmpeg Filters Guide: https://ffmpeg.org/ffmpeg-filters.html
- Hardware Acceleration Wiki: https://trac.ffmpeg.org/wiki/HWAccelIntro
AI/ML Specific Resources
- PyTorch Audio: https://pytorch.org/audio/
- TensorFlow I/O: https://www.tensorflow.org/io
- Hugging Face Audio Course: https://huggingface.co/learn/audio-course
Final Tips
- Start Simple: Master basic conversions before complex filtering
- Read Error Messages: FFmpeg provides detailed error information
- Test Small: Use short clips for testing complex operations
- Keep Updated: New codecs and features are added regularly
- Document Your Commands: Complex FFmpeg commands can be hard to remember
- Use Scripts: Automate repetitive tasks with bash or Python scripts
- Check Licenses: Understand GPL vs LGPL for commercial use
- Benchmark Performance: Test different codecs and settings for your use case
Acknowledgments
This guide represents the collective knowledge of the FFmpeg community and countless contributors who have made this powerful tool freely available. Special thanks to:
- The FFmpeg development team
- BtbN for maintaining Windows builds
- Gyan Gautam for comprehensive builds
- The open-source community for continuous improvements
Remember: FFmpeg is a powerful tool that’s constantly evolving. What works today might have a better solution tomorrow. Stay curious, keep learning, and don’t be afraid to experiment!
Last updated: 2025 FFmpeg version reference: 6.0+ For the latest updates, always check the official FFmpeg documentation.