Introduction
In recent years, Linux, particularly Ubuntu as an open-source operating system, has gained significant popularity not only for server deployment but also in desktop environments. Ubuntu has become especially favored among Linux beginners due to its user-friendly interface and robust community support. Meanwhile, Windows continues to dominate the desktop operating system market.
In today’s interconnected computing environments, the need for seamless file sharing between Linux and Windows systems has become increasingly important. However, since Linux and Windows utilize different file systems and management approaches, setting up cross-platform file sharing can initially seem daunting to many users.
This comprehensive guide explains how to configure file sharing between Ubuntu 24.04 LTS (and the newer Ubuntu 24.10) with Windows 10 and Windows 11 systems. We’ll focus primarily on GUI-based operations in the desktop environment while also covering essential command-line configurations when necessary.
Throughout this article, we’ll document actual errors encountered during setup and provide detailed solutions. This practical approach will serve as a valuable troubleshooting reference for readers facing similar challenges.
While file sharing between Linux and Windows may appear complex at first glance, with proper understanding and configuration, it becomes straightforward and reliable. Through this guide, you’ll master the fundamental concepts and practical methods for establishing robust file sharing between Ubuntu and Windows systems.
Let’s begin with configuring file sharing on the Ubuntu side.
Prerequisites
- Ubuntu 24.04 LTS or Ubuntu 24.10 Desktop version
- Windows 10 or Windows 11 PC
- Both computers connected to the same local area network (LAN)
- Administrator privileges on both systems
Important Changes in Ubuntu 24.04/24.10
Ubuntu 24.04 LTS introduced several significant changes to the file sharing setup process compared to previous versions. If you’re upgrading from Ubuntu 22.04 LTS or earlier, you’ll notice that the traditional “Local Network Share” option has been replaced with a new “Sharing Options” interface. This change reflects Ubuntu’s modernization of the Samba integration within the Nautilus file manager.
The new approach requires only the nautilus-share package – you no longer need to install the full Samba suite separately unless you require advanced manual configuration. This streamlined process makes file sharing more accessible to new users while maintaining the flexibility power users expect.
File Sharing Settings on Ubuntu (GUI Method)
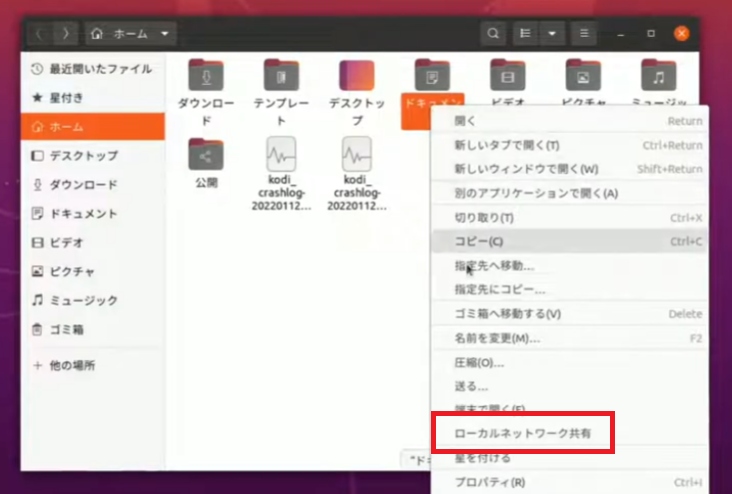
When attempting to set up file sharing in Ubuntu 24.04/24.10 desktop environment, you might notice that right-clicking on a folder doesn’t immediately show sharing options. In previous Ubuntu versions, there was an option called “Local Network Share” available by default, but this has changed significantly.
After researching the changes, I discovered that Ubuntu 24.04 and later versions use a different, more streamlined approach for setting up file sharing. The new procedure is as follows:
Step 1: Install the Nautilus Share Package
The primary requirement is installing the nautilus-share package, which extends the Nautilus file manager’s functionality to enable Samba-based file sharing directly from the context menu.
Open a terminal and enter the following command:
sudo apt update
sudo apt install nautilus-share
Note: Unlike older tutorials might suggest, you do NOT need to search for and install Samba separately from the App Center. The nautilus-share package handles all necessary Samba components automatically.
Step 2: Configure User Permissions
After installing nautilus-share, you need to add your user to the sambashare group and set up a Samba password:
# Add current user to sambashare group
sudo usermod -a -G sambashare $USER

# Set Samba password for current user
sudo smbpasswd -a $USER
You’ll be prompted to enter and confirm a password for Samba access. This password can be different from your Ubuntu login password, though using the same password can simplify access from Windows clients.
Step 3: Apply Changes
For the group membership changes to take effect, you need to log out and log back in. A full system restart is not required at this stage.
After logging back in, right-click on any folder you wish to share. You should now see a new option called “Sharing Options” in the context menu.
Understanding Nautilus-Share vs Traditional Samba
To clarify the relationship between these components:
- nautilus-share: An extension for the Nautilus file manager that provides GUI-based Samba share configuration
- Samba: The underlying service that implements the SMB/CIFS protocol for Windows-compatible file sharing
- SMB/CIFS: The network protocols that enable file sharing between different operating systems
The nautilus-share package automatically handles the Samba configuration in the background, creating what are known as “usershares” – shares that regular users can create without root privileges. These share definitions are stored in /var/lib/samba/usershares/ rather than the traditional /etc/samba/smb.conf file.
Setting Up File Sharing Using “Sharing Options”
Once you have “Sharing Options” available in the context menu, follow these steps to share a folder:
- Right-click on the folder you want to share and select “Sharing Options”
- The “Sharing Options” dialog box will appear with the following settings:
- Share this folder: Check this box to enable sharing
- Share name: The name that will appear on the network (defaults to the folder name)
- Comment: Optional description of the shared folder
- Allow others to create and delete files in this folder: Enables write access for network users
- Guest access (for people without a user account): Allows anonymous access without authentication
- Configure the options according to your security requirements and click “Create Share”
If the share is created successfully, the folder icon will display a small sharing indicator (usually a small emblem or hand icon). However, you may encounter an error at this stage.
Resolving Common File Sharing Errors
Error: ‘net usershare’ returned error 255
If you encounter this error when attempting to create a share:
'net usershare' returned error 255: net usershare: cannot open usershare directory /var/lib/samba/usershares. Error Permission denied
You do not have permission to create a usershare. Ask your administrator to grant you permissions to create a share.
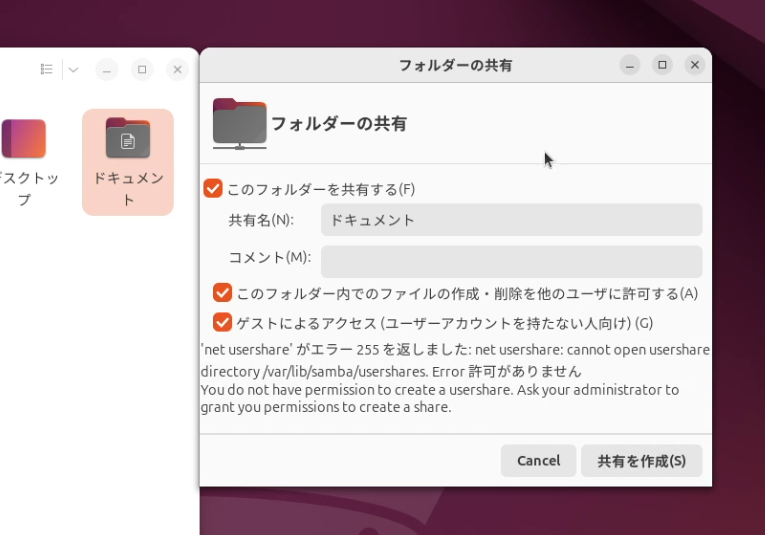
This error indicates that the Samba usershares directory doesn’t have the correct permissions. Follow these steps to resolve it:
Solution 1: Fix Directory Permissions
# Set correct ownership for usershares directory
sudo chown root:sambashare /var/lib/samba/usershares

# Set appropriate permissions
sudo chmod 1770 /var/lib/samba/usershares

# Restart the Samba service
sudo systemctl restart smbd

# Restart Nautilus to apply changes
nautilus -q
When running nautilus -q, you may see a message like:
** Message: 19:33:29.006: Connecting to org.freedesktop.Tracker3.Miner.Files
This is normal behavior – Nautilus is connecting to the Tracker file indexing service. This message can be safely ignored and doesn’t indicate an error.
Solution 2: Ensure User Group Membership
If the error persists, verify that your user is properly added to the sambashare group:
# Check current groups
groups $USER

# If sambashare is not listed, add it again
sudo usermod -a -G sambashare $USER

# Log out and log back in for changes to take effect
Solution 3: Configure Samba Settings (if needed)
In rare cases, you may need to modify the Samba configuration to enable usershare functionality:
# Edit Samba configuration
sudo nano /etc/samba/smb.conf
Add the following line in the [global] section if it’s not present:
usershare owner only = false
Save the file (Ctrl+O), exit (Ctrl+X), and restart Samba:
sudo systemctl restart smbd
Setting Appropriate Folder Permissions
When sharing folders via Samba, appropriate file system permissions are crucial for security and functionality. The shared folder typically needs permissions that balance accessibility with security.
Recommended Permission Settings
For most shared folders, use these permission settings:
- Owner: Read, Write, and Execute (7)
- Group: Read and Execute (5)
- Others: Read and Execute (5)
This translates to permissions of 755, which you can set via GUI or command line:
GUI Method:
- Right-click on the folder and select “Properties”
- Navigate to the “Permissions” tab
- Set permissions as follows:
- Owner: Create and delete files
- Group: Access files
- Others: Access files
Command Line Method:
chmod 755 /path/to/shared/folder
Important Note: Avoid using 777 permissions (full access for everyone) as this poses security risks and may cause Samba to restrict access for security reasons.
Supporting Folders with Non-ASCII Characters (Optional)
If you need to share folders with non-English characters (such as Japanese, Chinese, Arabic, etc.), you may need to configure character encoding. However, modern Ubuntu and Samba installations typically handle UTF-8 correctly by default.
First, try sharing folders with non-ASCII names without modification. If you encounter issues with character display, add these settings to the Samba configuration:
sudo nano /etc/samba/smb.conf
In the [global] section, add:
# Character encoding for international support
unix charset = UTF-8
dos charset = CP932  # For Japanese Windows clients (adjust for your locale)
display charset = UTF-8
For other languages, adjust the dos charset setting:
- Chinese (Simplified): CP936
- Chinese (Traditional): CP950
- Korean: CP949
- Western European: CP1252
- Cyrillic: CP1251
- Arabic: CP1256
After making changes, restart Samba:
sudo systemctl restart smbd
Manual Samba Configuration (Advanced Users)
While the GUI method through nautilus-share is sufficient for most users, advanced users may prefer direct configuration of Samba shares through the configuration file. This method provides more control over share parameters and advanced features.
Creating a Traditional Samba Share
- Edit the Samba configuration file:
sudo nano /etc/samba/smb.conf
- Add a new share definition at the end of the file:
[MyShare]
   path = /home/username/shared_folder
   browseable = yes
   read only = no
   guest ok = no
   valid users = username
   create mask = 0644
   directory mask = 0755
   force user = username
Parameters explained:
path: The actual filesystem path to sharebrowseable: Makes the share visible when browsing the networkread only: Set to ‘no’ to allow write accessguest ok: Set to ‘yes’ for anonymous access (less secure)valid users: Restricts access to specified userscreate mask: Default permissions for new filesdirectory mask: Default permissions for new directoriesforce user: All file operations will be performed as this user
- Create the shared directory if it doesn’t exist:
mkdir -p /home/username/shared_folder
- Restart Samba to apply changes:
sudo systemctl restart smbd
sudo systemctl restart nmbd
Connecting from Windows
Once file sharing is configured on Ubuntu, you can access the shares from Windows systems.
Method 1: Using File Explorer
- Open Windows File Explorer
- In the address bar, type:
\\<Ubuntu-IP-address>Or if the Ubuntu hostname is resolvable:\\<Ubuntu-hostname> - Press Enter. You should see the available shares.
- Double-click on a share to access it. If authentication is required, enter:
- Username: Your Ubuntu username
- Password: The Samba password you set earlier
Method 2: Mapping a Network Drive
For frequently accessed shares, you can map them as network drives:
- Right-click on “This PC” in File Explorer
- Select “Map network drive…”
- Choose a drive letter
- Enter the folder path:
\\<Ubuntu-IP>\<share-name> - Check “Reconnect at sign-in” for persistent mapping
- Click “Finish” and enter credentials if prompted
Troubleshooting Windows Connection Issues
If you cannot connect from Windows, check these common issues:
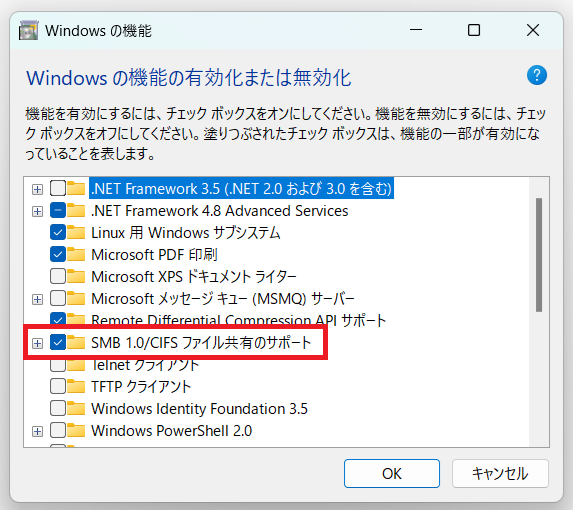
Windows 11 SMB Support
Windows 11 has SMB 1.0/CIFS disabled by default for security reasons. Ubuntu’s modern Samba installation uses SMB 2.0 and 3.0, so this shouldn’t be an issue. However, if you’re connecting to older systems, you may need to enable SMB 1.0:
- Open Control Panel → Programs → Turn Windows features on or off
- Look for “SMB 1.0/CIFS File Sharing Support”
- Enable it if absolutely necessary (not recommended for security reasons)
- Restart Windows
Security Warning: SMB 1.0 is vulnerable to exploits like WannaCry ransomware. Only enable it temporarily if absolutely necessary, and disable it when no longer needed.
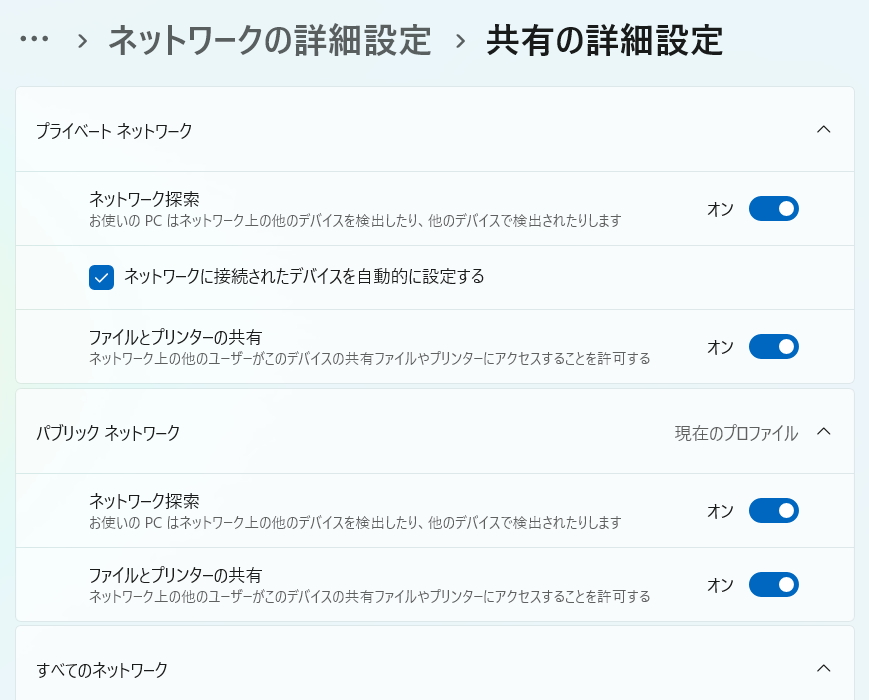
Network Discovery Settings
Ensure network discovery is enabled on Windows:
- Open Control Panel → Network and Sharing Center
- Click “Change advanced sharing settings”
- Enable “Turn on network discovery”
- Enable “Turn on file and printer sharing”
- Save changes
Making Ubuntu Visible in Windows Network
To make your Ubuntu machine appear in the Windows “Network” view, install the Web Services Dynamic Discovery daemon:
sudo apt install wsdd2
After installation, the Ubuntu machine should appear in Windows File Explorer’s Network section. This works with Windows 10 version 1803 and later, which use WS-Discovery instead of the older NetBIOS name resolution.
Alternative: Using Avahi for Network Discovery
If wsdd2 doesn’t work in your environment, you can use Avahi (Apple’s Bonjour protocol implementation):
sudo apt install avahi-daemon
sudo systemctl enable avahi-daemon
sudo systemctl start avahi-daemon
Security Considerations
Disabling Guest Access
For improved security, it’s recommended to disable guest access and require authentication:
- Edit your share settings in Nautilus (right-click → Sharing Options)
- Uncheck “Guest access”
Or in smb.conf:
[ShareName]
   guest ok = no
   valid users = user1,user2
Using Firewall Rules
If you’re using UFW (Uncomplicated Firewall), allow Samba traffic:
sudo ufw allow samba
For more granular control, allow specific ports:
# Samba ports
sudo ufw allow 139/tcp
sudo ufw allow 445/tcp

# NetBIOS ports (if needed)
sudo ufw allow 137/udp
sudo ufw allow 138/udp

# WS-Discovery for wsdd2
sudo ufw allow 3702/udp
sudo ufw allow 5357/tcp
Important Note About Ubuntu 24.04 Firewall Changes
Ubuntu 24.04 introduced changes to the default firewall configuration. If you upgraded from an earlier version and Samba stops working, check if nftables or firewalld were enabled:
# Check status
sudo systemctl status firewalld
sudo systemctl status nftables

# If using iptables/ufw, disable the others
sudo systemctl stop firewalld
sudo systemctl disable firewalld
sudo systemctl stop nftables
sudo systemctl disable nftables
Accessing Windows Shares from Ubuntu
Ubuntu can also access shares hosted on Windows machines or other SMB servers.
Method 1: Using the File Manager (GUI)
- Open Nautilus (Files application)
- Click “Other Locations” in the sidebar
- In the “Connect to Server” field, enter:
smb://server-ip-address/share-nameOr to browse all shares:smb://server-ip-address - Press Enter and provide credentials when prompted
The mounted share will appear in the sidebar for easy access.
Method 2: Using the Command Line
Install and use the smbclient tool:
# Install smbclient if not present
sudo apt install smbclient

# List available shares
smbclient -L //server-ip-address -U username

# Connect to a specific share
smbclient //server-ip-address/share-name -U username
Once connected, you can use FTP-like commands:
ls– List filesget filename– Download a fileput filename– Upload a filecd directory– Change directorylcd directory– Change local directoryexit– Disconnect
For files with spaces in names, use quotes:
get "file with spaces.txt"
Method 3: Mounting Permanently
To mount a Windows share permanently, edit /etc/fstab:
sudo nano /etc/fstab
Add a line like:
//server-ip/share /mount/point cifs username=user,password=pass,uid=1000,gid=1000,iocharset=utf8 0 0
For better security, use a credentials file instead of embedding the password:
- Create a credentials file:
sudo nano /etc/samba/credentials
- Add:
username=your_username
password=your_password
domain=WORKGROUP
- Secure the file:
sudo chmod 600 /etc/samba/credentials
- Update fstab to use the credentials file:
//server-ip/share /mount/point cifs credentials=/etc/samba/credentials,uid=1000,gid=1000,iocharset=utf8 0 0
Ubuntu 24.10 and Beyond
Ubuntu 24.10 “Oracular Oriole” was released in October 2024, marking the 20th anniversary of Ubuntu. While the file sharing setup process remains largely the same as Ubuntu 24.04, there are some improvements worth noting:
GNOME 47 Improvements
Ubuntu 24.10 includes GNOME 47, which brings enhancements to the Nautilus file manager:
- Restructured sidebar: Better organization of bookmarks and network locations
- Improved search: Better performance when searching network shares
- Drag-and-drop improvements: Easier organization of bookmarks and network locations
- Native file picker: Applications can now use Nautilus as the file picker, providing better thumbnail support
Performance Enhancements
- Better SMB performance with large file transfers
- Improved network discovery reliability
- Faster directory listing for shares with many files
Troubleshooting Quick Reference
Share Not Accessible from Windows
- Check Ubuntu firewall settings
- Verify Samba service is running:
sudo systemctl status smbd - Ensure Windows and Ubuntu are on the same network/workgroup
- Try accessing by IP address instead of hostname
- Check if nftables/firewalld are interfering (Ubuntu 24.04+)
Permission Denied Errors
- Verify Samba password is set:
sudo smbpasswd -a $USER - Check folder permissions: Should be 755, not 777
- Ensure user is in sambashare group:
groups $USER - Check share configuration for valid users
Ubuntu Machine Not Visible in Network
- Install wsdd2:
sudo apt install wsdd2 - Check Windows network discovery settings
- Verify both machines are on the same subnet
- Try accessing directly by IP address
Slow Transfer Speeds
- Check network connection (use gigabit ethernet if possible)
- Verify SMB version: Modern Samba uses SMB3 by default
- Check for network congestion or interference
- Consider mounting with specific SMB version options
Summary
Setting up file sharing between Ubuntu 24.04/24.10 and Windows has been significantly streamlined compared to earlier versions. The key points to remember:
Simplified Setup Process
For basic file sharing on Ubuntu 24.04/24.10, you only need:
- Install nautilus-share:
sudo apt install nautilus-share
- Configure user permissions:
sudo usermod -a -G sambashare $USER
sudo smbpasswd -a $USER
- Fix usershares directory permissions:
sudo chown root:sambashare /var/lib/samba/usershares
sudo chmod 1770 /var/lib/samba/usershares
- Restart services:
sudo systemctl restart smbd
nautilus -q
After logging out and back in, you can share folders through the right-click “Sharing Options” menu without editing configuration files.
Best Practices
- Use authentication instead of guest access for better security
- Set appropriate folder permissions (755 recommended)
- Keep SMB 1.0 disabled on Windows unless absolutely necessary
- Use wsdd2 for better Windows network integration
- Regular system updates ensure you have the latest security patches
Looking Forward
Ubuntu continues to improve its file sharing capabilities with each release. The transition from traditional Samba configuration to the streamlined nautilus-share approach demonstrates Ubuntu’s commitment to user-friendly functionality without sacrificing power user capabilities.
Whether you’re setting up a home media server, collaborating in a mixed-OS office environment, or simply sharing files between your devices, Ubuntu’s modern file sharing implementation provides a robust, secure, and user-friendly solution.
File sharing on Linux has evolved significantly, and Ubuntu 24.04/24.10 represents the current pinnacle of ease-of-use combined with enterprise-grade reliability. By following this guide, you should be able to establish reliable file sharing between Ubuntu and Windows systems with minimal complications.
Remember to always prioritize security in your sharing configuration, regularly update your systems, and adapt the settings to match your specific use case and environment requirements.