What is Seed-VC?
According to the GitHub repository, Seed-VC is a cutting-edge zero-shot voice changer and singing voice conversion tool that can clone voices using just 1-30 seconds of audio samples—no training required. The latest models achieve remarkable voice clarity and speaker similarity that surpasses previous voice conversion technologies.

In benchmark evaluations using the LibriTTS dataset, Seed-VC consistently outperformed two baseline models (OpenVoice and CosyVoice) in both intelligibility (clarity) and speaker similarity metrics.
Simply put, Seed-VC represents the state-of-the-art in voice conversion and cloning technology, delivering superior performance compared to other available models.
Today, I’ll guide you through installing Seed-VC on a Windows PC. Before diving into the installation, let me explain how Seed-VC is evaluated. While the numerous commands might seem intimidating for beginners, I’ll show you how to use Gradio for a user-friendly GUI (Graphical User Interface) experience. However, I’ll also cover the evaluation methods and command-line usage for those who prefer more control.
Introduction
Seed-VC is a revolutionary zero-shot voice conversion tool that can transform and clone speaker voices from brief audio samples without any training. This technology achieves exceptional accuracy and speaker similarity in voice conversion and cloning tasks, making it accessible even for beginners. This comprehensive guide will walk you through Seed-VC’s evaluation methods, installation process, and usage instructions to help you get started efficiently.
Evaluation Method (Understanding Seed-VC’s Performance)
1. How Seed-VC Evaluation Works
Seed-VC employs sophisticated evaluation techniques to assess voice conversion quality. The system is benchmarked against both zero-shot and non-zero-shot models (those pre-trained on specific speakers) to demonstrate its superior performance.
- What Makes Zero-Shot Special?
Traditional voice conversion models require extensive training on specific speaker voices. In contrast, zero-shot models like Seed-VC can clone and convert voices they’ve never encountered before—no training needed. This makes Seed-VC incredibly versatile and user-friendly. - Comparison with SoVITS Models
Seed-VC has been evaluated against various voice conversion models including SoVITS variants. Models like “Tokai Teio,” “Matikane Tannhäuser,” and “Milky Green” serve as benchmarks in the voice conversion field. - Reproducing the Evaluation
You can replicate these evaluations using the providedeval.pyscript. The evaluation leverages Facebook’s Hubert model and Resemblyzer to quantitatively assess voice conversion quality.
Running eval.py (Steps to Reproduce Evaluation)
To replicate Seed-VC’s voice conversion evaluation, use the following command:
python eval.py \
    --source ./examples/libritts-test-clean \
    --target ./examples/reference \
    --output ./examples/eval/converted \
    --diffusion-steps 25 \
    --length-adjust 1.0 \
    --inference-cfg-rate 0.7 \
    --xvector-extractor "resemblyzer" \
    --baseline ""  # Specify "OpenVoice" or "CosyVoice" for comparison
    --max-samples 100  # Evaluate up to 100 audio samples
Parameter Breakdown:
source: Original audio files to be convertedtarget: Reference voice audio filesoutput: Directory for saving conversion resultsdiffusion-steps: Controls conversion quality vs. processing time (higher = better quality)length-adjust: Audio length modifier (1.0 = original, <1.0 = shorter, >1.0 = longer)xvector-extractor: Speaker feature extraction model (Resemblyzer)baseline: Enables comparison with other models
2. Practical Usage Instructions
This section details how to perform voice conversion using Seed-VC, particularly via command-line interface.
Command-Line Voice Conversion
python inference.py \
    --source <source-wav> \
    --target <reference-wav> \
    --output <output-dir> \
    --diffusion-steps 25  # 25 for speech, 50-100 for singing
    --length-adjust 1.0 \
    --inference-cfg-rate 0.7 \
    --f0-condition False  # Set True for singing voice
    --auto-f0-adjust False  # True for automatic pitch adjustment
    --semi-tone-shift 0  # Pitch adjustment in semitones
Parameter Details:
source: Input audio file for conversiontarget: Reference voice for the target speakeroutput: Output directory for resultsdiffusion-steps: Quality control (25 standard, 50-100 for singing)length-adjust: Speed control (default 1.0)inference-cfg-rate: Fine-tuning parameter (default 0.7)f0-condition: Pitch matching for singing (True/False)auto-f0-adjust: Automatic pitch adjustmentsemi-tone-shift: Manual pitch adjustment in semitones
3. Installation Prerequisites
Whether using command-line or Gradio interface, you’ll need to install required packages via pip install -r requirements.txt. Python 3.10 is strongly recommended for optimal compatibility.
Gradio Interface – The Beginner-Friendly Approach
For those who find command-line interfaces daunting, Gradio provides an intuitive web-based solution. Gradio transforms Python code into user-friendly web applications, allowing you to experiment with Seed-VC’s voice conversion capabilities without memorizing commands or navigating terminal windows.
Brief Introduction to Gradio
Gradio is a powerful tool that converts Python functions into interactive web applications. With Seed-VC’s Gradio integration, you can perform voice conversions through your web browser—no terminal expertise required. Let me show you how to get it running.
Step 1: Cloning the Git Repository
Cloning a Git repository means downloading a project’s files and code from the internet to your local computer. GitHub hosts countless projects, and Seed-VC is one of them.
Start with this command:
git clone https://github.com/Plachtaa/seed-vc.git
Command Breakdown:
git: Invokes the Git version control systemclone: Commands Git to copy the repositoryhttps://github.com/Plachtaa/seed-vc.git: The repository URL
This command downloads the entire Seed-VC project and creates a seed-vc folder in your current directory.
Execution Steps:
- Open your command-line interface (PowerShell or Command Prompt on Windows, Terminal on macOS/Linux)
- Type the command above and press Enter
The Seed-VC code is now on your computer. Pro tip: VS Code offers the most convenient and user-friendly development experience for this project.
Step 2: Python Version Requirements
Seed-VC requires Python as specified on the GitHub page. While Python is versatile and widely used, different versions can behave differently.
Understanding “Suggested Python 3.10”
The Seed-VC project recommends Python 3.10 for optimal performance. While other versions might work, 3.10 ensures the best compatibility and minimizes potential errors. If you have a different version installed, consider using pyenv to manage multiple Python versions rather than reinstalling.

Python Installation Guide for Beginners:
If Python 3.10 isn’t installed on your system, follow these steps:
- Visit the Python official website
- Download the installer for your operating system (Windows, macOS, or Linux)
- Important: During installation, check the “Add Python 3.x to PATH” checkbox—this ensures Python is easily accessible from anywhere on your system
- After installation, verify by opening a command prompt and typing:
python --version
If you see Python 3.10.x, congratulations—installation successful!
Step 3: Configuring the Seed-VC Project
With the repository cloned and Python 3.10 ready, it’s time to install the necessary packages listed in requirements.txt.
Understanding requirements.txt
Let’s examine what’s inside requirements.txt:
--extra-index-url https://download.pytorch.org/whl/cu113
torch
torchvision
torchaudio
scipy==1.13.1
librosa==0.10.2
huggingface-hub
munch
einops
descript-audio-codec
git+https://github.com/openai/whisper.git
gradio
pydub
resemblyzer
jiwer
transformers
onnxruntime
Package Explanations
--extra-index-url: Points to PyTorch’s repository for CUDA-specific versionstorch,torchvision,torchaudio: Core PyTorch packages for deep learning and audio processingscipy,librosa: Scientific computing and audio analysis librarieshuggingface-hub,transformers: Hugging Face’s NLP and model management toolsmunch,einops,descript-audio-codec: Data manipulation and audio codec utilitiesgit+https://github.com/openai/whisper.git: OpenAI’s Whisper for speech recognitiongradio: Web interface creation toolpydub: Audio file manipulationresemblyzer,jiwer: Voice similarity and speech recognition evaluation toolsonnxruntime: Efficient model execution runtime
Installation Process Using requirements.txt
Now let’s install these packages systematically.
Steps:
- Create a Python Virtual Environment (Highly Recommended)
Virtual environments isolate project dependencies, preventing conflicts between different projects. This keeps your system clean and organized.
python -m venv venv
This creates a venv folder containing an isolated Python environment.
- Activate the Virtual Environment
- Windows:
.\venv\Scripts\activate(or justvenv\Scripts\activatein VS Code) - macOS/Linux:
source venv/bin/activate
When activated, you’ll see (venv) in your command prompt.
- Install Required Packages
pip install -r requirements.txt
This automatically installs all necessary packages.
Troubleshooting Common Installation Issues
If you encounter problems, don’t panic! Here are solutions to common issues:
Error Messages and Solutions
When specific packages fail to install, carefully read the error messages. They often indicate missing dependencies like C++ build tools. Installing the necessary tools typically resolves these issues.
CUDA-Related Errors
PyTorch versions are tied to specific CUDA versions for GPU acceleration. If you don’t have a compatible CUDA installation or want to use CPU-only mode (though much slower), modify the requirements.txt:
--extra-index-url https://download.pytorch.org/whl/cpu
The Actual Error I Encountered
Here’s a real error message I faced during installation:
DEPRECATION: webrtcvad is being installed using the legacy 'setup.py install' method...
error: Microsoft Visual C++ 14.0 or greater is required. Get it with "Microsoft C++ Build Tools": https://visualstudio.microsoft.com/visual-cpp-build-tools/
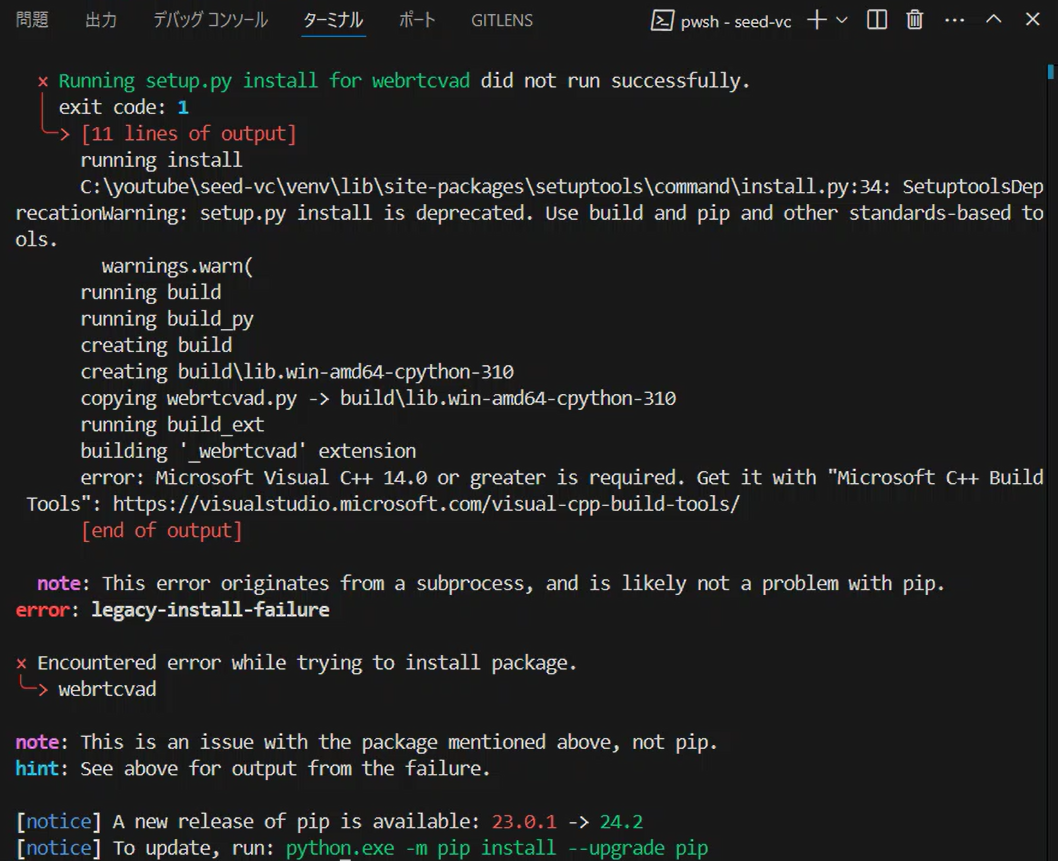
This error indicates that webrtcvad requires Microsoft Visual C++ Build Tools for compilation. Specifically, Microsoft Visual C++ 14.0 or higher is missing from your system.
Solution: Installing Microsoft C++ Build Tools
To resolve this:
- Visit Microsoft C++ Build Tools
- Download and run the installer
- Select “Desktop development with C++” workload, which includes Visual C++ 14.0 and necessary components
Why Are Microsoft C++ Build Tools Necessary?
Many Python libraries contain C++ components that require compilation during installation. On Windows, Microsoft C++ Build Tools provide the necessary compiler and tools. For Seed-VC, packages like torch and webrtcvad require these tools for proper installation.
Also Upgrade pip (Recommended)
Update pip to the latest version:
python.exe -m pip install --upgrade pip
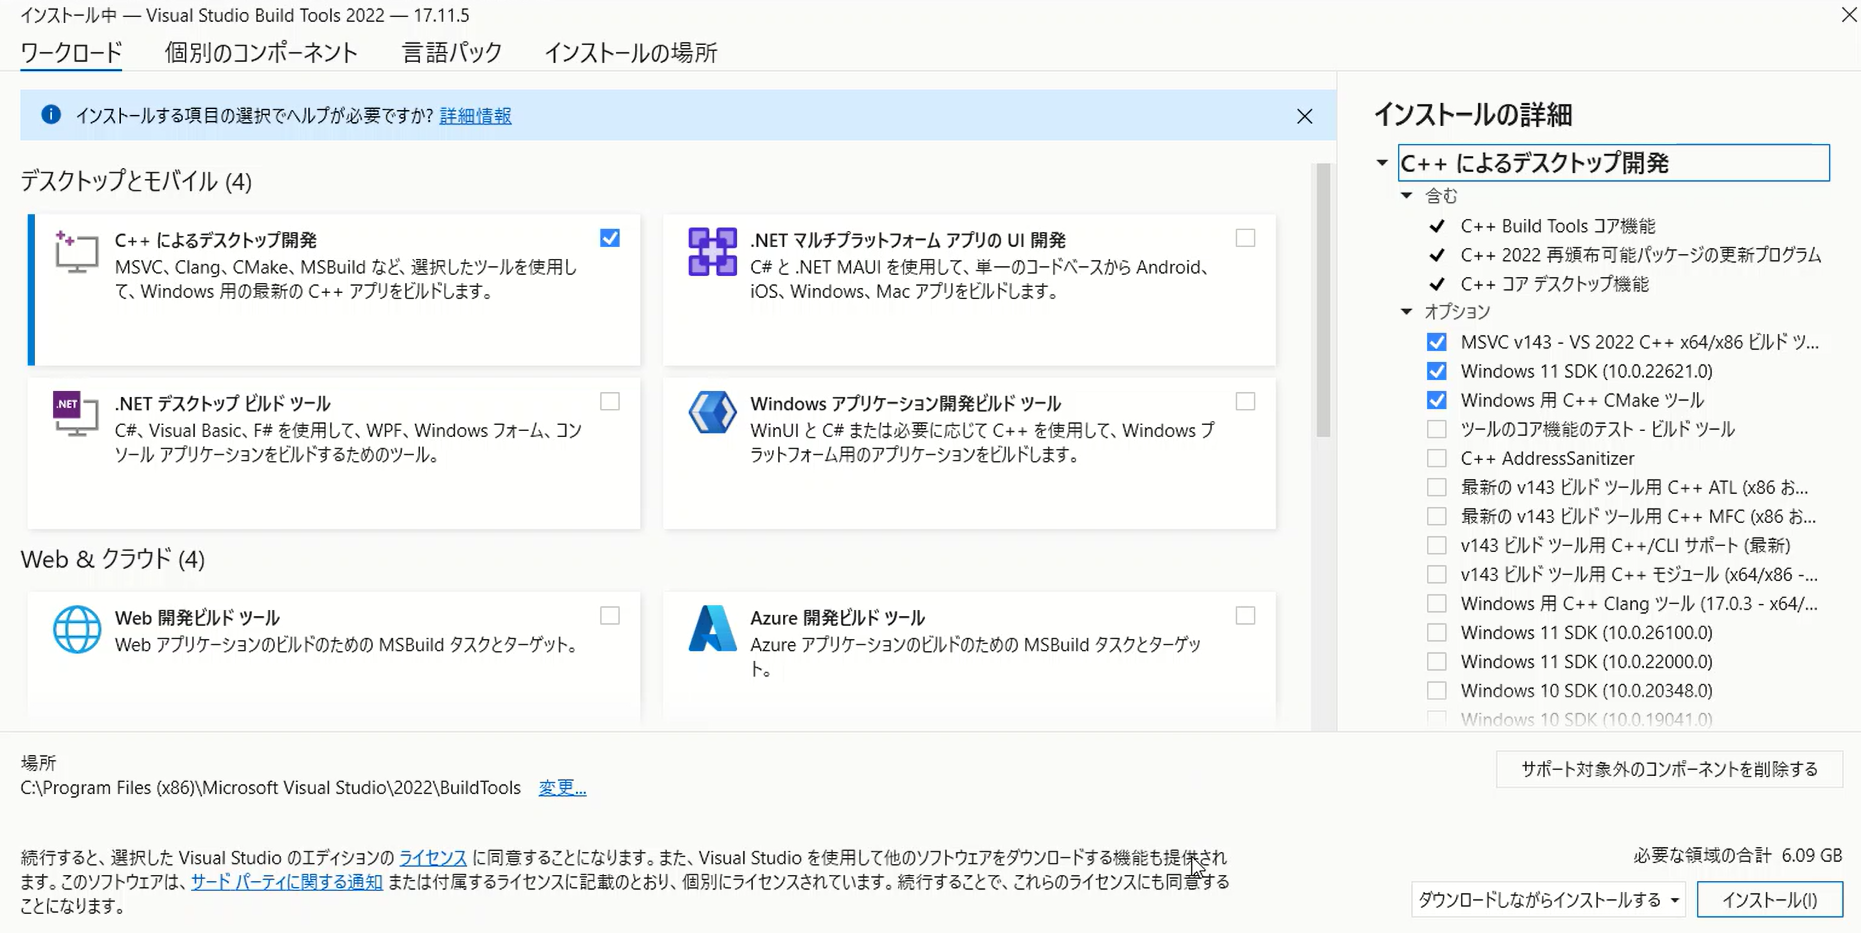
Microsoft C++ Build Tools Installation Guide
When installing Microsoft C++ Build Tools, you only need specific components for Python package compilation.
Essential Components to Select
Desktop Development with C++
This is the most crucial selection—ensure “Desktop development with C++” is checked.
Why this matters: This workload includes the Microsoft Visual C++ compiler and related tools essential for compiling Python packages.
Additional Components
When selecting “Desktop development with C++”, several options are automatically selected. Here’s what you actually need:
Required Components (Usually Auto-Selected):
- MSVC v143 – VS 2022 C++ x64/x86 build tools (or latest version)
- The core C++ compiler for Python package compilation
- Windows 11 SDK (or Windows 10 SDK for Windows 10)
- Essential libraries and headers for Windows development
- C++ CMake tools for Windows
- Build process management tool often used in package compilation
Optional Components:
- Core Tools for Testing: Not required for Seed-VC, can be unchecked
- C++ Address Sanitizer: Advanced debugging tool, not needed for our purposes
Minimal Setup Summary:
- ✅ Windows 11 SDK: Required
- ⚠️ Core Tools for Testing: Optional
- ⚠️ C++ Address Sanitizer: Optional
Click “Install” after making your selections. Installation takes time, but resolves compilation errors for Python packages.
Post-Installation Verification
After installation completes, retry the package installation:
pip install -r requirements.txt
This should successfully install all required packages for Seed-VC.
Note for Linux/WSL Users
Microsoft C++ Build Tools are Windows-specific. For WSL or Linux environments, you’ll need different tools:
# For Linux/WSL
sudo apt update
sudo apt install build-essential
sudo apt install libssl-dev libffi-dev python3-dev
build-essential on Linux provides functionality equivalent to Microsoft C++ Build Tools on Windows, including gcc/g++ compilers and essential development tools.
Launching the Browser Interface
With all dependencies installed, launch the web interface:
python app.py
This script performs several important tasks:
What Happens During Startup:
- Model Downloads: The script uses
load_custom_model_from_hfto download multiple models from Hugging Face:- Plachta/Seed-VC: Core voice conversion model
- funasr/campplus: Voice style extraction model
- nvidia/bigvgan_v2_22khz_80band_256x: High-quality voice synthesis using BigVGAN
- lj1995/VoiceConversionWebUI: F0 (fundamental frequency) estimation
- openai/whisper-small: Whisper model for voice processing
- Model Loading and Configuration: Each model is loaded and configured, with
torch.devicedetermining whether to use GPU or CPU based on availability. - Voice Conversion Function: The
voice_conversionfunction handles the actual conversion process, accessible through Gradio’s web interface.
The script automatically downloads necessary models from Hugging Face and configures them for voice conversion, high-quality synthesis, and F0 adjustment. Gradio then provides an intuitive browser interface for easy voice conversion.
Accessing the Interface:
Open your browser and navigate to:
http://127.0.0.1:7860/
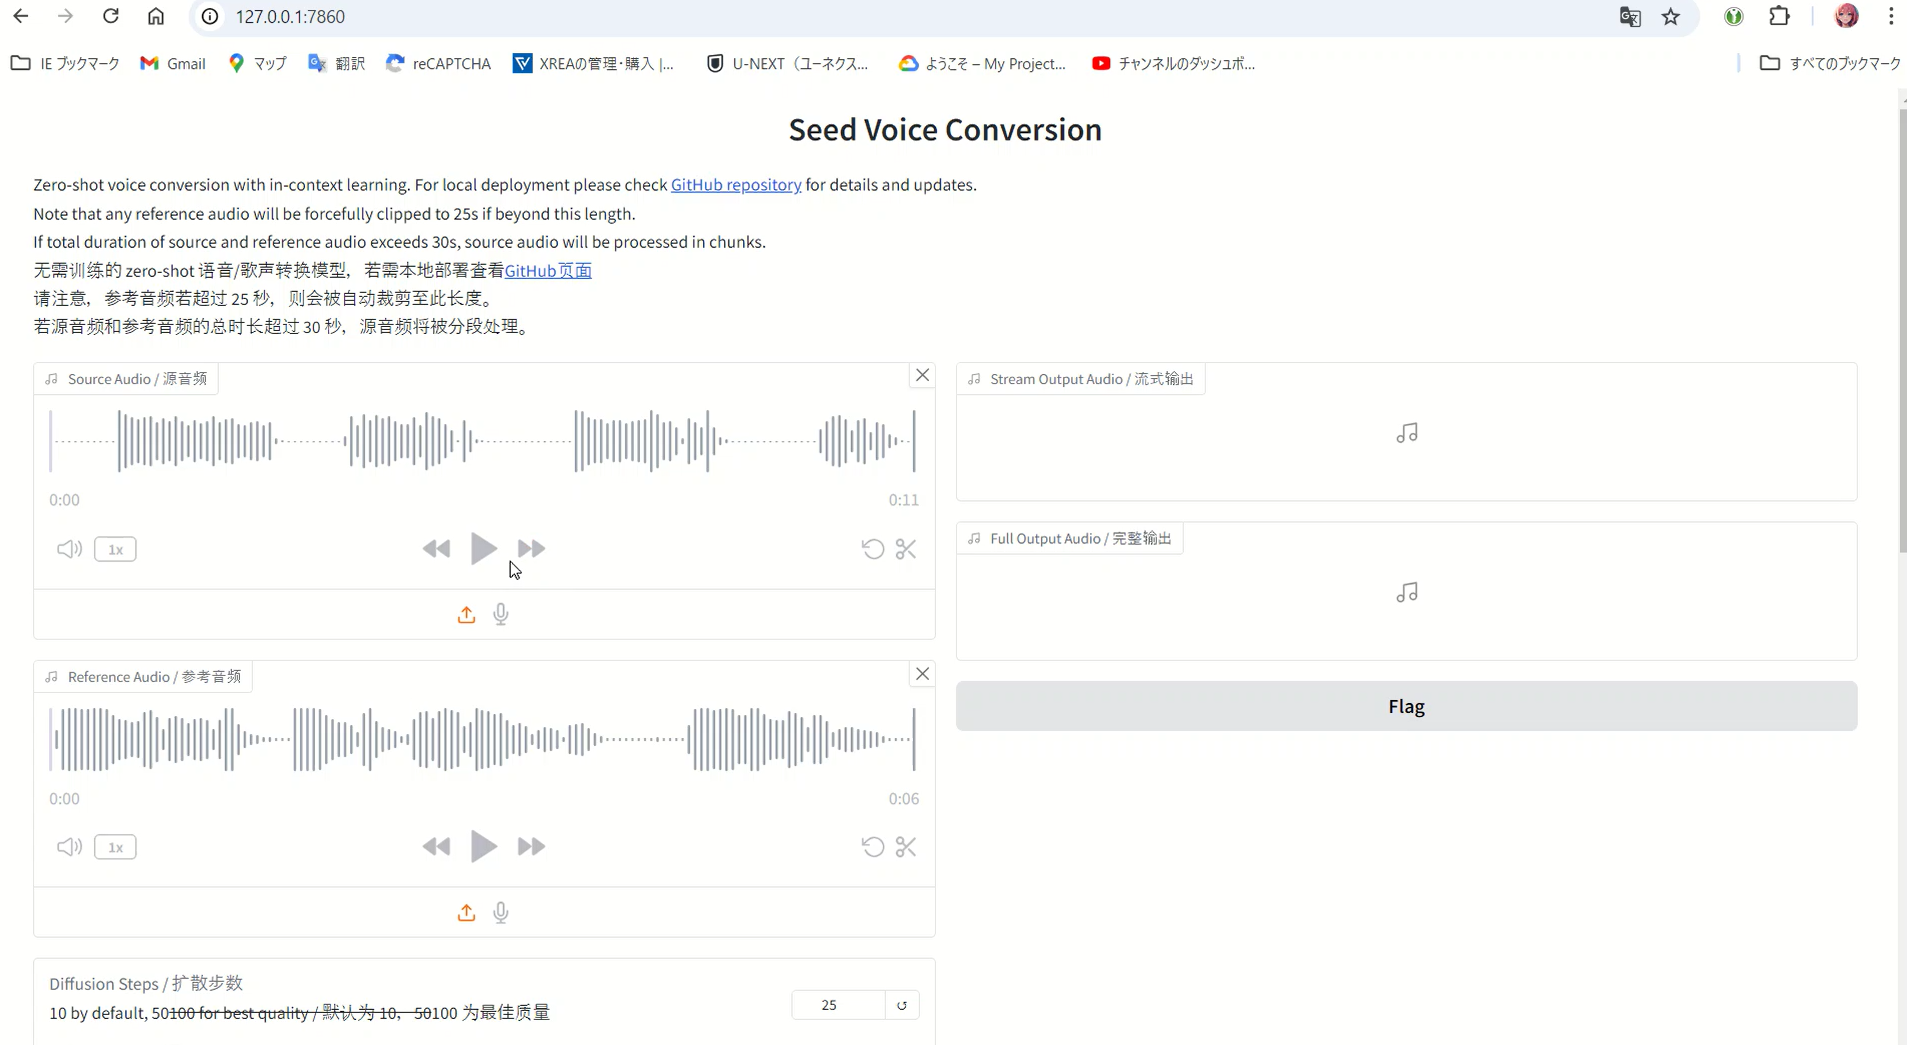
How to Use the Interface
The process is straightforward:
- Upload the voice you want to clone to “Reference Audio”
- Upload the voice you want to convert to “Source Audio”
- Click convert and wait for the magic to happen
The output will have the voice characteristics of the Reference Audio. However, I noticed the processing was surprisingly slow despite using GPU, so I investigated the issue.
Diagnosing Performance Issues
First, check your CUDA version:
nvcc --version
My output showed:
nvcc: NVIDIA (R) Cuda compiler driver
Copyright (c) 2005-2024 NVIDIA Corporation
Built on Thu_Mar_28_02:30:10_Pacific_Daylight_Time_2024
Cuda compilation tools, release 12.4, V12.4.131
Build cuda_12.4.r12.4/compiler.34097967_0
With CUDA 12.4 installed, the PyTorch version specified for CUDA 11.3 (cu113) in the --extra-index-url creates a compatibility mismatch.
Checking the PyTorch website (https://pytorch.org) confirmed that CUDA 12.4 was the latest supported version at the time.
When PyTorch and CUDA versions don’t align, performance suffers significantly. Using CUDA 12.4 requires the corresponding PyTorch version.
Solution: Installing PyTorch for CUDA 12.4
Modify requirements.txt by changing the --extra-index-url line:
--extra-index-url https://download.pytorch.org/whl/cu124
Then:
- Delete the old
venvfolder - Recreate the virtual environment
- Reinstall packages
The performance improvement was dramatic—processing that took minutes now completed in seconds!
Understanding the Performance Improvement
Let me explain why the speed increased so dramatically:
GPU vs CPU Processing
GPUs excel at parallel processing of large datasets, while CPUs are better suited for general sequential tasks. Voice conversion and deep learning involve massive data processing that GPUs handle exponentially faster than CPUs.
The Role of CUDA
CUDA (Compute Unified Device Architecture) is NVIDIA’s framework for GPU-accelerated computing. PyTorch leverages CUDA to maximize GPU performance, dramatically increasing processing speeds.
However, mismatched PyTorch and CUDA versions prevent efficient GPU utilization. The initial PyTorch installation (CUDA 11.3 compatible) couldn’t properly utilize my CUDA 12.4 installation, causing the slowdown.
The Importance of Version Alignment
By installing CUDA 12.4-compatible PyTorch, the GPU could operate at full capacity. This alignment enables optimal parallel processing, resulting in the dramatic speed improvement.
Real-World Performance Gains
To illustrate: tasks that take 10-15 minutes on CPU might complete in 30 seconds on GPU. This represents a 20-30x speedup—the true power of GPU acceleration.
The version mismatch initially prevented GPU utilization, forcing slower CPU processing. After aligning versions, the GPU took over, delivering the expected performance boost.
The Developer Behind Seed-VC: Plachtaa’s Voice Technology Ecosystem
The developer of Seed-VC, known as Plachtaa (Songting), has created an impressive ecosystem of voice-related technologies. Understanding these projects provides valuable context for Seed-VC’s capabilities.
Plachtaa’s Major Projects
1. VALL-E X – Cross-lingual Zero-shot TTS
VALL-E X is Plachtaa’s open-source implementation of Microsoft’s VALL-E X model. While Microsoft published the research paper, they didn’t release code or models. Plachtaa’s team successfully reproduced and improved upon the original work.
Key Features:
- Multilingual TTS supporting English, Chinese, and Japanese
- Zero-shot voice cloning from 3-10 second samples
- Cross-lingual synthesis (e.g., English speaker speaking Chinese)
- Emotion preservation across languages
- Maximum generation length: 22 seconds (with ongoing work for longer texts)
Technical Approach: VALL-E X generates speech from text, unlike Seed-VC’s voice-to-voice conversion.

2. Seed-VC – Voice-to-Voice Conversion
Named after Seed-TTS (whose methods inspired it), Seed-VC focuses on direct voice conversion rather than text-to-speech generation.
Key Differentiators:
- Voice-to-voice conversion (not text-to-speech)
- Supports both speech and singing voice conversion
- Real-time processing capabilities
- V2 models with style/emotion transfer
Performance: The latest checkpoint achieves performance close to Seed-TTS’s voice conversion model, with continuous improvements in each release.

3. VITS-fast-fine-tuning – Rapid Voice Adaptation
This project enables quick voice adaptation for VITS models, allowing users to add custom voices in under an hour.
Capabilities:
- Many-to-many voice conversion between custom and preset characters
- Trilingual support (Chinese, Japanese, English)
- Fine-tuning from as little as 3 minutes of audio
- Support for video and BILIBILI sources
- Pre-trained models for various character voices
Use Case: Perfect for content creators wanting to add specific character voices to their projects quickly.
4. Amphion – Comprehensive Audio Generation Toolkit
While not solely Plachtaa’s project, they contribute to Amphion, a toolkit for audio, music, and speech generation aimed at supporting reproducible research and helping newcomers to the field.
Comparing the Technologies
| Project | Type | Input | Output | Best For |
|---|---|---|---|---|
| VALL-E X | TTS | Text | Speech | Creating speech from text in any voice |
| Seed-VC | Voice Conversion | Voice | Voice | Converting existing audio to different voices |
| VITS-fast-fine-tuning | Fine-tuning | Voice samples | Custom model | Adding specific voices to existing models |
Which Tool Should You Use?
- Use Seed-VC when: You have audio that needs voice conversion, want real-time processing, or need singing voice conversion
- Use VALL-E X when: You need to generate speech from text, require cross-lingual capabilities, or want emotion control
- Use VITS-fast-fine-tuning when: You need to add specific character voices permanently to a model
Each tool excels in its specific domain, and they can be combined for comprehensive voice processing pipelines.
Advanced Optimization Techniques
For those seeking maximum performance, here are advanced optimization strategies:
CPU Optimization Approaches
While GPUs are preferred, CPU optimization can help when GPU isn’t available:
- Enhanced Parallel Processing:
torch.set_num_threads(os.cpu_count())
torch.set_num_interop_threads(1)  # Improves thread coordination
- Model Quantization:
model = torch.quantization.quantize_dynamic(
    model, {torch.nn.Linear}, dtype=torch.qint8
)
- JIT Compilation:
model = torch.jit.script(model)
- Batch Processing: Process multiple samples simultaneously for better throughput
- Memory Management: Regularly clear unused tensors and use
torch.cuda.empty_cache()for GPU memory - Data Type Optimization: Use float16 instead of float32 when possible
- Asynchronous I/O: Implement async file operations to reduce CPU idle time
- Profiling: Use
cProfileorline_profilerto identify bottlenecks - NumPy Integration: Sometimes NumPy operations are faster for specific computations
- Model Pruning: Remove non-essential parameters to reduce model size
Remember to test performance after each optimization and consider accuracy trade-offs.
FFmpeg Considerations
While requirements.txt doesn’t explicitly list FFmpeg, libraries like librosa and pydub may require it for audio processing. pydub particularly depends on FFmpeg for many operations.
Do You Need FFmpeg?
- If processing stays within Python: FFmpeg on host may not be necessary
- If handling audio files directly on Windows: FFmpeg installation recommended
For Windows users needing FFmpeg: https://vibelsd.com/ffmpeg-install/
2025 Updates and V2 Models
Major Changes Since Initial Release
Seed-VC has undergone significant updates, particularly with the introduction of V2 models:
V2 Model Architecture
- CFM (Continuous Flow Matching): Handles core voice conversion
- AR (Autoregressive) Model: Manages style, emotion, and accent transfer
New Launch Methods
# Enable both V1 and V2 (recommended)
python app.py --enable-v1 --enable-v2

# V2 only (for new users)
python app.py --enable-v2

# With compilation for 6x speedup
python app_vc_v2.py --compile
Performance Improvements
- Support for CUDA 12.6 and higher
--compileflag provides up to 6x performance improvement- Automatic chunking for long audio files
- Real-time processing capabilities
V2 Parameters Explained
- Diffusion Steps: 25-30 for speech, 50-100 for singing
- Convert Style: Enable for emotion/accent transfer
- Intelligibility CFG Rate: Controls linguistic clarity
- Similarity CFG Rate: Controls voice similarity
- Temperature & Top-p: Fine-tune style transfer characteristics
Choosing Between V1 and V2
Use V1 when:
- Limited GPU memory (<6GB)
- Simple voice conversion needed
- Stability is priority
Use V2 when:
- Style/emotion transfer required
- Modern GPU available (8GB+ VRAM)
- Best quality output desired
Note on CUDA 12.6
Seed-VC has been updated with full CUDA 12.6 support. After running git pull to update the repository, ensure you:
- Update PyTorch to match your CUDA version
- Clear old model caches
- Reinstall requirements with updated specifications
The performance improvements make these updates worthwhile, even if reconfiguration is required.

Conclusion
Seed-VC represents the cutting edge of voice conversion technology, offering unprecedented capabilities for both beginners and advanced users. With proper setup and configuration—particularly ensuring CUDA version compatibility—you’ll experience remarkable voice conversion quality and speed.
The ecosystem of tools from Plachtaa provides comprehensive solutions for various voice-related tasks, from text-to-speech with VALL-E X to rapid voice adaptation with VITS-fast-fine-tuning. Understanding these tools and their relationships helps you choose the right solution for your specific needs.
Whether you’re a content creator, researcher, or enthusiast, Seed-VC’s combination of quality, versatility, and ease of use makes it an invaluable tool in the modern voice technology landscape. Happy voice converting! 🎙️✨