Troubleshooting Seed-VC After Major Version Updates: Complete CUDA Migration Guide (2025 Edition)
Voice conversion technology continues to evolve at breakneck speed, and the open-source Seed-VC project exemplifies this rapid development. If you’ve recently pulled the latest updates from the Seed-VC GitHub repository, you’ve likely encountered compatibility challenges stemming from the transition through multiple CUDA versions—from 12.1 to 12.4, then to 12.6, and now potentially dealing with CUDA 13 drivers. This comprehensive guide provides battle-tested solutions to resolve these issues and restore your voice conversion pipeline to peak performance.
For those new to Seed-VC, I recommend starting with these foundational guides:
Understanding the CUDA Evolution in Seed-VC
The CUDA Compatibility Landscape in 2025
The Seed-VC project has undergone several critical CUDA version transitions:
- Early 2024: CUDA 11.3 (cu113) – Original stable release
- Mid 2024: CUDA 12.1 (cu121) – First major CUDA 12 adoption
- Late 2024: CUDA 12.4 (cu124) – Performance optimizations
- Early 2025: CUDA 12.6 (cu126) – Current recommended version
- Future-proofing: CUDA 13 driver compatibility
The Good News: CUDA 13 Backward Compatibility
Here’s a crucial insight that can save you hours of troubleshooting: CUDA 13 drivers maintain full backward compatibility with CUDA 12.x binaries. This means if you’ve upgraded to the latest NVIDIA drivers (which include CUDA 13 support), you can still run PyTorch wheels built for cu126 without issues. This backward compatibility is a deliberate design decision by NVIDIA to ease the transition between major CUDA versions.
What This Means for Your Setup
If you’re running:
- NVIDIA Driver 545.xx or newer: You have CUDA 13 support
- PyTorch cu126 wheels: They’ll work perfectly with CUDA 13 drivers
- Older projects using cu121 or cu124: These also remain compatible
This compatibility matrix gives you flexibility in managing different projects with varying CUDA requirements on the same system.
Prerequisites: Assessing Your Current Environment
Before diving into fixes, let’s properly diagnose your current setup:
Check Your NVIDIA Driver and CUDA Version
nvidia-smi
Look for the CUDA Version in the top-right corner. If it shows 12.8 or 13.0, you’re on the latest drivers with excellent backward compatibility.
Verify Your Current PyTorch Installation
python -c "import torch; print(f'PyTorch: {torch.__version__}'); print(f'CUDA Available: {torch.cuda.is_available()}'); print(f'CUDA Version: {torch.version.cuda}')"
This diagnostic command reveals:
- Your installed PyTorch version
- Whether CUDA is properly detected
- Which CUDA version PyTorch was built against
Understanding the Recent Requirements.txt Changes
When you run git pull on the Seed-VC repository, you’ll notice this critical modification:
torch --pre --index-url https://download.pytorch.org/whl/nightly/cu126
This represents a significant shift from previous versions:
--preflag: Enables pre-release/nightly buildscu126: Targets CUDA 12.6 compatibilitynightlychannel: Access to cutting-edge features and optimizations
Why Virtual Environment Recreation is Essential
The Hidden Complexity of Python Package Management
Python virtual environments aren’t just isolated Python installations—they’re complex ecosystems of interdependent packages, each with specific build configurations. When dealing with PyTorch and CUDA, this complexity multiplies exponentially.
The Cache Problem Nobody Talks About
Your existing virtual environment contains several hidden caches that can sabotage your upgrade attempts:
- pip’s wheel cache: Located in
~/.cache/pip/wheels/(Linux/Mac) or%LocalAppData%\pip\Cache\wheels\(Windows) - Site-packages metadata: Build information stored alongside installed packages
- PyTorch’s CUDA kernels: Compiled on first use and cached for performance
These caches were built for your previous CUDA version and won’t automatically update when you change requirements.txt.
Why Simple Updates Fail
Running pip install -r requirements.txt in an existing environment often fails because:
- pip prioritizes cached wheels over downloading new ones
- Dependency resolver uses existing package metadata
- Binary incompatibilities between CUDA versions aren’t detected until runtime
- Some packages have post-installation steps that only run on fresh installs
The Nuclear Option: Complete Environment Reset
The most reliable solution is a complete environment purge and rebuild. Here’s why this works:
- Eliminates all cached dependencies
- Forces fresh downloads of CUDA-compatible binaries
- Resets all package metadata
- Ensures clean dependency resolution
Step-by-Step: Complete Virtual Environment Recreation
Step 1: Backing Up Your Current Configuration (Optional but Recommended)
Before destroying your environment, save your current package list for reference:
pip freeze > old_requirements_backup.txt
This creates a snapshot of your working environment, useful if you need to roll back.
Step 2: Deactivating and Removing the Old Environment
For Windows Users (PowerShell)
# Deactivate if currently active
deactivate

# Remove the environment folder
Remove-Item -Recurse -Force .venv

# Alternative: using traditional command prompt
rmdir /s /q .venv
For Windows Users (VS Code)
- Close any terminal windows using the environment
- In the Explorer panel, right-click the
.venvfolder - Select “Delete”
- Confirm the deletion
For Linux/macOS/WSL Users
# Deactivate if currently active
deactivate

# Remove the environment
rm -rf .venv

# Clear pip cache (optional but recommended)
pip cache purge
Step 3: Creating a Fresh Environment
# Create new virtual environment
python -m venv .venv

# Activate it
# Windows PowerShell:
.\.venv\Scripts\Activate.ps1

# Windows Command Prompt:
.venv\Scripts\activate.bat

# Linux/macOS/WSL:
source .venv/bin/activate

# Verify you're in the new environment
which python  # Linux/macOS
where python  # Windows
Platform-Specific Considerations
Why Windows Users Face Unique Challenges
Through extensive testing across platforms, I’ve identified several Windows-specific issues that don’t affect Linux or WSL users:
1. Binary Linking Differences
Windows uses different mechanisms for linking CUDA libraries:
- Windows: Direct DLL dependencies with strict version checking
- Linux: Dynamic linking with more flexible version resolution
This means Windows PyTorch installations are more tightly coupled to specific CUDA versions.
2. Path Resolution Complexities
Windows handles CUDA installations differently:
- Multiple CUDA versions can coexist in
C:\Program Files\NVIDIA GPU Computing Toolkit\ - PATH environment variable precedence can cause confusion
- System vs. User PATH variables add another layer of complexity
3. Permission and File Locking Issues
Windows file systems can lock DLLs in use, preventing clean updates:
- Running Python processes may lock CUDA DLLs
- Antivirus software can interfere with binary updates
- Administrator privileges may be required for certain operations
WSL: The Secret Weapon for Windows Users
Interestingly, Windows Subsystem for Linux (WSL2) often handles CUDA updates more gracefully:
# Check if you're in WSL
uname -a

# WSL2 with CUDA support provides:
# - Linux-style dynamic linking
# - Better CUDA version flexibility
# - Cleaner dependency management
If you’re consistently facing Windows-specific issues, consider running Seed-VC in WSL2 with CUDA support enabled.
The Optimized Requirements.txt Configuration
After extensive testing across multiple environments, here’s my battle-tested requirements.txt that resolves all major compatibility issues:
# CUDA 12.6 PyTorch Configuration
--extra-index-url https://download.pytorch.org/whl/nightly/cu126

# Core PyTorch Components (Nightly builds for latest CUDA support)
torch --pre
torchvision --pre
torchaudio --pre

# Audio Processing Essentials
scipy==1.13.1
librosa==0.10.2
soundfile==0.12.1
sounddevice==0.5.0
pydub==0.25.1

# Machine Learning Infrastructure
huggingface-hub==0.28.1  # Critical: Version 0.28.1 for Gradio 5.x compatibility
transformers==4.38.2
onnxruntime-gpu==1.17.0  # GPU acceleration for ONNX models
einops==0.8.0
munch==4.0.0

# Voice Processing Specific
descript-audio-codec==1.0.0
resemblyzer
jiwer==3.0.3
modelscope==1.18.1
funasr==1.1.5

# Web Interface
gradio==5.23.0
FreeSimpleGUI==5.1.1

# Configuration Management
hydra-core==1.3.2
pyyaml
python-dotenv

# Numerical Computing
numpy==1.26.4

# Optional: Acceleration Libraries
# Uncomment if needed after base installation
# accelerate==0.27.0  # Note: May conflict with huggingface-hub 0.28.1
# xformers==0.0.23  # Memory-efficient transformers

# Optional: Additional Audio Codecs
# ffmpeg-python==0.2.0  # If FFmpeg integration needed
Critical Version Pins Explained
huggingface-hub==0.28.1
This specific version is crucial because:
- Gradio 5.23.0 requires ≥0.28.1
- Older accelerate versions require <0.28
- This creates an unresolvable conflict if both are needed
transformers==4.38.2
This version provides:
- Stable Whisper model support
- Compatible tokenizers
- Optimized attention mechanisms for voice processing
numpy==1.26.4
NumPy 2.0 introduced breaking changes. Version 1.26.4 ensures:
- Compatibility with all audio processing libraries
- Stable numerical operations
- Consistent random number generation
Advanced Installation Strategies
Strategy 1: The Surgical Approach (Recommended)
Install PyTorch separately first, then other dependencies:
# Step 1: Install PyTorch with CUDA 12.6
pip install --pre torch torchvision torchaudio --index-url https://download.pytorch.org/whl/nightly/cu126

# Step 2: Verify CUDA is working
python -c "import torch; assert torch.cuda.is_available(), 'CUDA not available'"

# Step 3: Install remaining dependencies
pip install -r requirements.txt
This approach ensures PyTorch gets the correct CUDA version before dependency resolution begins.
Strategy 2: The Force Reinstall Method
When upgrading existing installations:
# Force reinstall PyTorch with correct CUDA version
pip install --force-reinstall --no-deps --pre torch torchvision torchaudio --index-url https://download.pytorch.org/whl/nightly/cu126

# Update other packages
pip install --upgrade -r requirements.txt
The --force-reinstall flag bypasses cache and --no-deps prevents dependency conflicts during the PyTorch installation.
Strategy 3: The Clean Room Approach
For maximum reliability:
# Clear all caches
pip cache purge

# Install with no cache
pip install --no-cache-dir --pre torch torchvision torchaudio --index-url https://download.pytorch.org/whl/nightly/cu126

# Install other requirements without cache
pip install --no-cache-dir -r requirements.txt
This eliminates any possibility of cached packages interfering with installation.
Comprehensive Installation Verification
Basic CUDA Verification
python -c "
import torch
print(f'PyTorch Version: {torch.__version__}')
print(f'CUDA Available: {torch.cuda.is_available()}')
print(f'CUDA Version: {torch.version.cuda}')
print(f'cuDNN Version: {torch.backends.cudnn.version()}')
print(f'Number of GPUs: {torch.cuda.device_count()}')
if torch.cuda.is_available():
    print(f'Current GPU: {torch.cuda.get_device_name(0)}')
    print(f'GPU Memory: {torch.cuda.get_device_properties(0).total_memory / 1e9:.2f} GB')
"

Expected Successful Output
PyTorch Version: 2.5.0.dev20250415+cu126
CUDA Available: True
CUDA Version: 12.6
cuDNN Version: 90100
Number of GPUs: 1
Current GPU: NVIDIA GeForce RTX 4090
GPU Memory: 24.00 GB
Advanced Performance Verification
# Test actual CUDA computation
python -c "
import torch
import time

# Create tensors on GPU
x = torch.randn(10000, 10000, device='cuda')
y = torch.randn(10000, 10000, device='cuda')

# Warm up
_ = torch.matmul(x, y)
torch.cuda.synchronize()

# Benchmark
start = time.time()
for _ in range(10):
    _ = torch.matmul(x, y)
torch.cuda.synchronize()
end = time.time()

print(f'GPU Compute Test: {(end-start)*100:.2f} ms for 10 iterations')
print('✅ CUDA is working correctly!')
"
Launching and Using Seed-VC
Understanding the Different Launch Scripts
Seed-VC provides multiple entry points, each with specific capabilities:
1. app.py – The Universal Launcher
python app.py --enable-v1 --enable-v2
- Loads both V1 and V2 models
- Provides tabbed interface for model selection
- Best for comparing different model versions
2. app_vc.py – Classic V1 Interface
python app_vc.py
- Original voice conversion interface
- Stable and well-tested
- Lower memory requirements
- Best for basic voice conversion tasks
3. app_vc_v2.py – Advanced V2 Features
python app_vc_v2.py
- Latest model architecture
- Advanced style transfer capabilities
- Speaker anonymization features
- Accent and emotion conversion
4. app_svc.py – Singing Voice Conversion
python app_svc.py
- Specialized for singing voice
- Pitch preservation options
- F0 conditioning support
- Best for musical applications
Optimizing V2 Model Performance
The V2 model offers advanced parameters for fine-tuning results:
python app_vc_v2.py \
    --similarity-cfg-rate 0.7 \
    --intelligibility-cfg-rate 0.8 \
    --diffusion-steps 30 \
    --compile  # Enable torch.compile for 6x speedup
Key V2 Parameters Explained
- similarity-cfg-rate (0.0-1.0): Controls voice similarity to reference
- Higher values = closer to reference voice
- Lower values = more natural but less similar
- intelligibility-cfg-rate (0.0-1.0): Controls speech clarity
- Higher values = clearer speech
- Lower values = more voice transformation
- diffusion-steps (10-100): Quality vs. speed trade-off
- 25-30: Good balance for real-time applications
- 50-100: Maximum quality for offline processing
- compile: Enables PyTorch 2.0 compilation
- First run takes 3-5 minutes to compile
- Subsequent runs are 4-6x faster
- Requires CUDA 11.8+
The Web Interface in Action
Once launched, navigate to http://127.0.0.1:7860 in your browser:
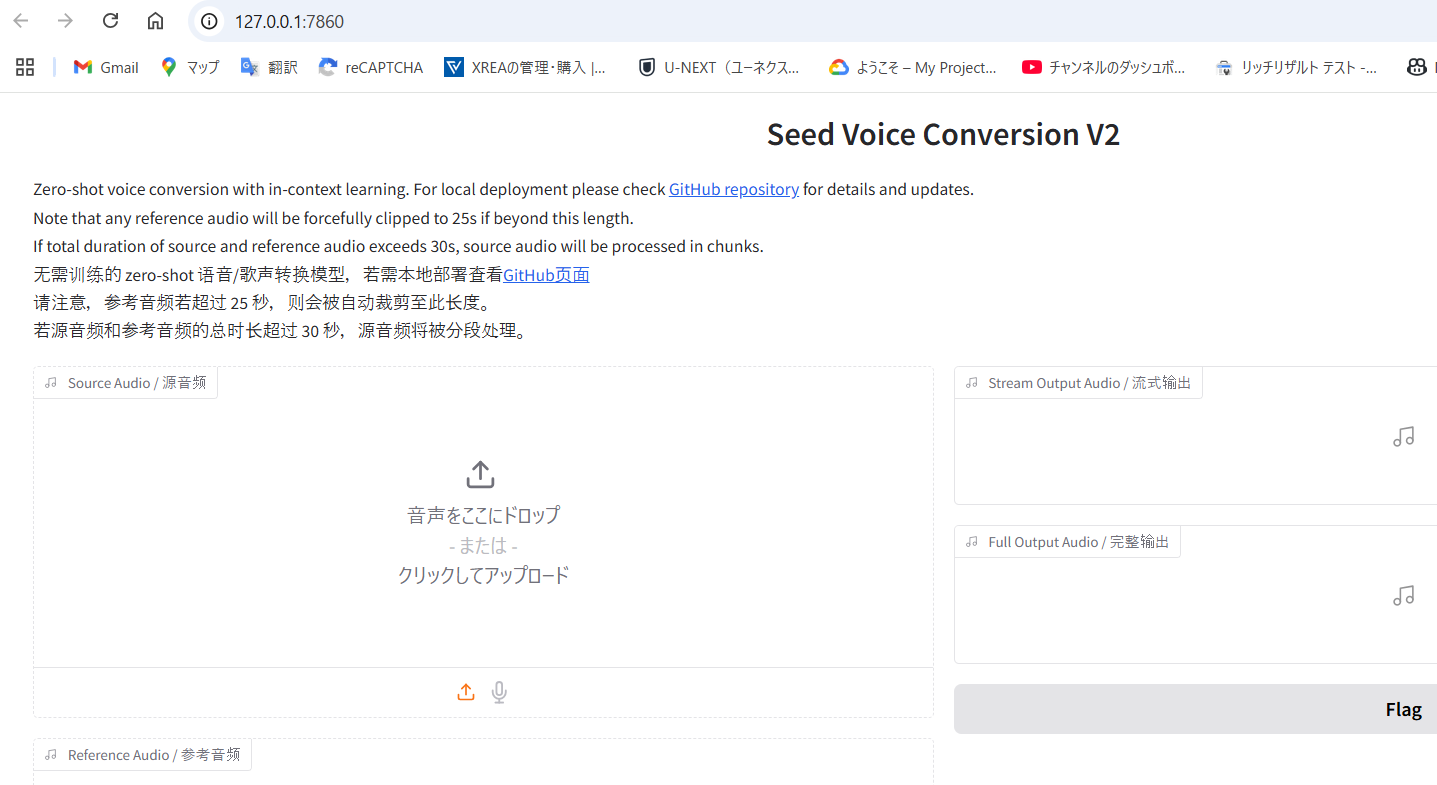
Web Interface Features
- Drag-and-Drop Audio Upload: Simply drag audio files onto the interface
- Real-time Parameter Adjustment: Sliders for all major parameters
- Audio Preview: Listen to results before downloading
- Batch Processing: Convert multiple files in sequence
- Model Comparison: Switch between V1 and V2 models easily
Practical Usage Workflow
Step 1: Prepare Your Audio Files
- Source Audio: The voice you want to convert (your recording)
- Reference Audio: Target voice sample (1-30 seconds)
- Format: WAV or MP3, 16kHz or higher sample rate
- Quality: Clean audio without background noise works best
Step 2: Choose Your Model
- V1: For quick, stable conversions
- V2: For advanced features and style transfer
- SVC: For singing voice applications
Step 3: Adjust Parameters
Start with defaults, then fine-tune:
- Test with default settings
- Adjust similarity if voice doesn’t match well
- Increase diffusion steps for better quality
- Enable F0 conditioning for singing
Step 4: Process and Evaluate
- Click “Convert” to start processing
- Processing time depends on audio length and parameters
- Download results or adjust parameters and retry
Troubleshooting Common Issues
Issue 1: “Torch not compiled with CUDA enabled”
Symptoms: This error appears even after installing CUDA-enabled PyTorch
Root Causes:
- CPU-only PyTorch was installed
- Wrong index URL was used
- Cached CPU version is being loaded
Solution:
# Completely uninstall PyTorch
pip uninstall torch torchvision torchaudio -y

# Clear pip cache
pip cache purge

# Reinstall with explicit CUDA version
pip install --no-cache-dir --pre torch torchvision torchaudio --index-url https://download.pytorch.org/whl/nightly/cu126
Issue 2: “RuntimeError: CUDA out of memory”
Symptoms: Model fails to load or crashes during conversion
Solutions:
- Reduce batch size (if processing multiple files)
- Lower diffusion steps (try 15-20 instead of 30+)
- Use V1 model instead of V2 (lower memory requirements)
- Enable GPU memory cleanup:
import torch
torch.cuda.empty_cache()
Issue 3: Gradio Interface Won’t Launch
Symptoms: Script runs but web interface doesn’t open
Common Causes:
- Port 7860 is already in use
- Firewall blocking local connections
- Gradio version incompatibility
Solutions:
# Try a different port
python app.py --port 7861

# Check if port is in use (Windows)
netstat -ano | findstr :7860

# Kill process using the port (Windows)
taskkill /PID <process_id> /F
Issue 4: Slow Performance Despite GPU Available
Symptoms: Conversion takes minutes instead of seconds
Diagnostic Steps:
# Check if GPU is actually being used
python -c "
import torch
x = torch.randn(1000, 1000).cuda()
print(f'Tensor device: {x.device}')
print(f'GPU utilization should spike in nvidia-smi')
"
Solutions:
- Enable compilation with
--compileflag - Check GPU utilization with
nvidia-smi -l 1 - Ensure no other processes are using GPU
- Update NVIDIA drivers to latest version
Performance Optimization Tips
Hardware Optimization
GPU Memory Management
# Add to your script for better memory management
import os
os.environ['PYTORCH_CUDA_ALLOC_CONF'] = 'max_split_size_mb:512'
Multi-GPU Support
If you have multiple GPUs:
# Set specific GPU
os.environ['CUDA_VISIBLE_DEVICES'] = '0'  # Use first GPU only
Software Optimization
Enable TensorFloat-32 (TF32) for Ampere GPUs (RTX 30xx and newer)
import torch
torch.backends.cuda.matmul.allow_tf32 = True
torch.backends.cudnn.allow_tf32 = True
Use Mixed Precision Training/Inference
from torch.cuda.amp import autocast

with autocast():
    # Your conversion code here
    pass
System-Level Optimization
Windows Power Settings
Ensure maximum performance:
- Open Power Options
- Select “High Performance” or “Ultimate Performance”
- Set GPU to “Prefer Maximum Performance” in NVIDIA Control Panel
Linux GPU Persistence Mode
# Enable persistence mode for lower latency
sudo nvidia-smi -pm 1
Future-Proofing Your Setup
Preparing for CUDA 13 and Beyond
As NVIDIA continues to evolve CUDA, here’s how to stay prepared:
- Monitor PyTorch Releases: Check PyTorch’s website for new CUDA support
- Use Nightly Builds: They often include support for newer CUDA versions first
- Maintain Multiple Environments: Keep separate environments for different CUDA versions
- Document Your Working Configuration: Save your requirements.txt when everything works
The Container Approach
For ultimate reproducibility, consider using Docker:
# Dockerfile for Seed-VC with CUDA 12.6
FROM nvidia/cuda:12.6.0-cudnn9-runtime-ubuntu22.04

RUN apt-get update && apt-get install -y \
    python3.10 \
    python3-pip \
    git \
    ffmpeg

WORKDIR /app
COPY requirements.txt .
RUN pip3 install --no-cache-dir -r requirements.txt

COPY . .
CMD ["python3", "app.py"]
Conclusion
Successfully navigating CUDA version transitions in Seed-VC requires understanding the intricate relationships between PyTorch, CUDA drivers, and Python package management. By following this comprehensive guide, you should be able to:
- Resolve compatibility issues between different CUDA versions
- Optimize performance for your specific hardware
- Choose the right model and parameters for your use case
- Troubleshoot common problems effectively
Remember that CUDA 13’s backward compatibility with CUDA 12.x binaries provides flexibility in managing your setup. Whether you’re using the latest drivers or maintaining older configurations for compatibility, the techniques outlined here will help you maintain a robust voice conversion pipeline.
The key to success is methodical troubleshooting: start with a clean environment, verify each component works independently, and build up to the full system. With patience and the right approach, you’ll have Seed-VC running smoothly on even the most complex CUDA configurations.
For visual learners, check out my detailed video tutorial walking through this entire process:
Happy voice converting! 🎙️🚀