1. What is Serena?
Serena is a tool that translates instructions in natural language (your everyday conversational language) into commands that can be executed in a terminal.
In short, it’s like setting up a “dedicated AI assistant server” locally that understands your PC’s environment and your project’s status.
This eliminates the need to copy and paste code or explain the project’s background every time you collaborate with AI agents like Claude or GPT. The AI can directly understand the files and code in your local environment through Serena, enabling it to provide more context-aware and accurate support.
2. Advantages of Introducing Serena
By introducing Serena, development and terminal operations become faster, safer, and more intuitive.
| Aspect | Benefit | Description |
|---|---|---|
| 🔒 Privacy | Securely collaborate with AI without sending code externally | Even if company regulations or security policies make it difficult to send code to external services, you can use it with peace of mind as everything is completed within your local environment. |
| 📚 Continuous Knowledge | The AI “remembers” the entire structure of the project | Once you let the AI read a project, it will respond based on its understanding of the relationships between files and the overall picture, dramatically improving the accuracy of the conversation. |
| 💸 Token Savings | Significantly reduce communication costs with the AI | You no longer need to send lengthy code or files to the AI every time, which greatly saves on API usage fees (token consumption). |
| ⚡ Improved Work Efficiency | Intuitively operate commands with natural language | Just by saying things like “run the tests for main.py” or “delete unnecessary Docker images,” it can generate and execute the appropriate commands. |
| 🧠 Improved Response Accuracy | Reduces the AI’s irrelevant answers due to lack of context | Since the AI always has a grasp of the project’s overall picture, it prevents conversations from becoming disjointed due to “insufficient context.” |
3. Installation and Execution Method
Based on the procedure described in serena.txt, I have organized the general installation method.
Prerequisites
- Python: 3.11 (Note: 3.12 is not supported)
- uv: A fast Python package management tool
- Git: Used to download the source code
Procedure
Step 1: Install uv
If you haven’t installed uv yet, execute the following command. This assumes a WSL (Ubuntu) environment. It also assumes you have Codex CLI, Gemini CLI, and Claude Code installed. If you are on native Windows, please skip this step.
curl -LsSf https://astral.sh/uv/install.sh | sh
Step 2: Run Serena (The easiest way is to use uvx)
Using uvx automates the cloning of the repository and the creation of a virtual environment, allowing you to start Serena directly.
uvx --from git+https://github.com/oraios/serena serena-mcp-server
✅ Summary of the Issue
uv/uvxare installed in~/.local/bin/- But when you call
uvxin the shell, it says “command not found” - Cause: That directory is not in your “PATH”
🔧 Solution: Temporarily Apply the PATH (to run it immediately)
Copy and paste the following as is and execute it:
export PATH="$HOME/.local/bin:$PATH"
Then, again:
uvx --from git+https://github.com/oraios/serena serena start-mcp-server
💡 This should make uvx recognizable.
🔁 Permanent Solution (to make it usable in the next login session)
If you are using bash:
echo 'export PATH="$HOME/.local/bin:$PATH"' >> ~/.bashrc
source ~/.bashrc
If you are using zsh:
echo 'export PATH="$HOME/.local/bin:$PATH"' >> ~/.zshrc
source ~/.zshrc
✅ Final Confirmation:
which uvx
If it outputs the following, you have succeeded:
/home/mamu/.local/bin/uvx
About Permanent Integration of codex CLI and serena
Even if you run uvx --from ... serena start-mcp-server once, it’s a temporary server launch that will disappear upon the next login.
The Correct Recipe (codex CLI / TOML / Latest Version Tracking)
~/.codex/config.toml (or <project>/.codex/config.toml. The project side takes precedence)
Here is an example 👇
# ~/.codex/config.toml
# ※ Please match the filename you are actually editing (the content is unified in TOML)
[projects."/home/mamu/serial"]
trust_level = "trusted"

[projects."/home/mamu/rev"]
trust_level = "trusted"

[projects."/home/mamu/codex-cli"]
trust_level = "trusted"

[projects."/home/mamu/wpbk"]
trust_level = "trusted"

# ----- MCP Server Definition (Serena) -----
[mcp_servers.serena]
command = "uvx"
args = [
  "--from", "git+https://github.com/oraios/serena",
  "serena", "start-mcp-server",
  "--context", "codex",
  "--enable-web-dashboard=false"
]
Only add a tag like git+...@v0.1.4 when you want to fix the version.
To run it fixed for a project, add "--project", "/home/mamu/your-project-abs-path" (absolute path) at the end.
Verification Flow (1-2 lines are OK)
- Start
codexat the project root → enter/mcpin the input field- Expected display content
/mcp
🔌 MCP Tools
• Server: serena • Command: uvx –from git+https://github.com/oraios/serena serena start-mcp-server –context codex –enable-web-dashboard=false • Tools: activate_project, check_onboarding_performed, delete_memory, find_file, find_referencing_symbols, find_symbol, get_symbols_overview, insert_after_symbol, insert_before_symbol, list_dir, list_memories, onboarding, read_memory, replace_symbol_body, search_for_pattern, think_about_collected_information, think_about_task_adherence, think_about_whether_you_are_done, write_memory
🎯 If you want to paste the one-liner for everything, here it is
export PATH="$HOME/.local/bin:$PATH"
uvx --from git+https://github.com/oraios/serena serena start-mcp-server
However, as it is now:
🔴 Serena started with
uvx --from ...runs in the foreground
In other words, if you close the terminal, Serena will also stop.
✅ Solution: How to make it reside in the background
You can use one of the following methods to start Serena in the background.
Overview
This explains three ways to run Serena stably in the background using UV. Choose the most suitable method according to your needs.
🚀 Method 1: Use nohup + & (Easy)
Features
- Easiest: Run immediately with a one-line command
- Log Output: Save output to a file
- Terminal Independent: Continues to run even if you close the terminal
How to Run
# Start Serena in the background
nohup uvx --from git+https://github.com/oraios/serena serena start-mcp-server > ~/serena.log 2>&1 &
Operation Check and Log Monitoring
# Check process
ps aux | grep serena

# Monitor logs in real-time
tail -f ~/serena.log

# Check the entire log
cat ~/serena.log
How to Terminate the Process
# Check process ID
ps aux | grep serena

# Terminate the process (replace [PID])
kill [PID]

# Or force terminate
pkill -f serena
Pros and Cons
✅ Pros
- Can be executed immediately without configuration
- Logs are saved automatically
- Simple and easy to understand
❌ Cons
- Manual process management
- No automatic recovery on abnormal termination
🖥️ Method 2: Keep it resident with tmux (Convenient)
Features
- Session Management: Can connect/disconnect at any time
- For Debugging: Check logs in real-time
- Flexibility: Can execute commands as needed
Create and Run a tmux Session
# Create a new tmux session named "serena"
tmux new -s serena

# Start Serena within the session
uvx --from git+https://github.com/oraios/serena serena start-mcp-server
📌 Important: Detach the Session
Once Serena starts, exit the session with the following key combination:
1. Press Ctrl + b
2. Immediately press d
Result: You will return to the terminal, but Serena will continue running in the background within tmux.
Session Management Commands
# Check session list
tmux list-sessions

# Reconnect to the session
tmux attach -t serena

# Delete the session (also terminates Serena)
tmux kill-session -t serena

# Check all tmux sessions
tmux ls
If using screen (alternative to tmux)
# Create a screen session
screen -S serena

# Start Serena
uvx --from git+https://github.com/oraios/serena serena start-mcp-server

# Detach: Ctrl + A -> D

# Reconnect
screen -r serena
Pros and Cons
✅ Pros
- Can return to the session at any time to check logs
- Easy debugging and troubleshooting
- Can manage multiple servers in different sessions
❌ Cons
- Need to learn basic tmux/screen operations
- Manual restart required after system reboot
⚙️ Method 3: Auto-start with a systemd unit (For production)
Features
- Fully Automated: Starts automatically on system boot
- Fault Recovery: Automatic restart on abnormal termination
- Log Management: Centralized log management with
journalctl - Production Use: Recommended method for server environments
Create a systemd Service File
# Create the service file
sudo nano /etc/systemd/system/serena.service
Service File Content
[Unit]
Description=Serena MCP Server
After=network.target
Wants=network.target

[Service]
Type=simple
User=your_username
Group=your_username
WorkingDirectory=/home/your_username
Environment=PATH=/home/your_username/.local/bin:/usr/local/bin:/usr/bin:/bin
ExecStart=/home/your_username/.local/bin/uvx --from git+https://github.com/oraios/serena serena start-mcp-server
Restart=always
RestartSec=10
StandardOutput=journal
StandardError=journal

[Install]
WantedBy=multi-user.target
Enable and Manage the Service
# Reload systemd to read the new file
sudo systemctl daemon-reload

# Enable the service (set to auto-start)
sudo systemctl enable serena.service

# Start the service
sudo systemctl start serena.service

# Check service status
sudo systemctl status serena.service

# Check logs
sudo journalctl -u serena.service -f

# Stop the service
sudo systemctl stop serena.service

# Disable the service
sudo systemctl disable serena.service
Configuration Notes
- Change
your_usernameto your actual username - Check the path to
uvx(can be found withwhich uvx) - Set permissions appropriately
Pros and Cons
✅ Pros
- Automatic start on system boot
- Automatic restart on abnormal termination
- Standard Linux service management
- Centralized log management
❌ Cons
- Configuration is somewhat complex
- Requires root privileges
🎯 Recommended Method by Use Case
Development/Testing Environment
tmux/screen method (Method 2)
- Easy debugging
- Can be stopped/restarted immediately as needed
Personal Regular Use
nohup method (Method 1)
- Easy configuration
- Sufficient for daily use
Server/Production Environment
systemd method (Method 3)
- Highest stability and reliability
- Includes auto-recovery feature
With the combination of UV and Serena, flexible background execution is possible depending on the use case. It is recommended to first try the nohup method and then migrate to tmux or systemd as needed.
✍️ Personal Recommendation
| If you are… | Recommendation |
|---|---|
| Just want to try it out | ✅ nohup + & |
| Want to use it continuously for development | ✅ tmux |
| Want to run it in production/persistently | ✅ systemd |
(Alternative) If you want to download and run it locally
If you want to manage the source code on your machine, follow these steps:
- Clone the repository
git clone https://github.com/oraios/serena.gitcd serena - Start Serena
uv run serena-mcp-server
I used tmux, but there are some points to note as below.
1. For Ubuntu
tmuxis not installed by default (even on Ubuntu 25.04).- You need to install it before use:
sudo apt update sudo apt install tmux - After installation, you can use it right away (no configuration file is needed).
2. For Windows
tmux does not run on Windows natively. You will need to use one of the following methods.
Method A: Use it within WSL (Windows Subsystem for Linux)
- Enter WSL’s Ubuntu, etc., and install it as above:
sudo apt install tmux - The procedure and usage are completely the same as in Linux.
Method B: Use it with Git Bash or MSYS2, etc.
tmuxis often provided as a package in these environments as well.- However, it may not be fully compatible (especially key bindings).
Method C: Use it with Windows Terminal + SSH connection
- Do not install
tmuxon the local Windows, but starttmuxon a remote Linux (VPS or WSL). - In practice, this causes the least trouble.
💡 Practically, it is best for Windows users to run tmux on WSL or a remote Linux. The reasons are:
tmuxitself is a terminal multiplexer for Linux.- On native Windows, it may conflict with the GUI and its behavior can be unstable.
🪟 Windows Version UV Background Startup Guide
Complete Guide to Running UV Commands in the Background
Important Note for Windows
tmux does not work on Windows alone! It is only available on Unix-like operating systems such as Linux and macOS. To use Linux-based tools on Windows, you need WSL or Git Bash.
🚀 PowerShell + Start-Process
The simplest method using Windows’ standard PowerShell.
Start-Process powershell -ArgumentList "-Command", "uvx --from git+https://github.com/oraios/serena serena start-mcp-server" -WindowStyle Hidden
Pros
- Standard Windows feature
- No additional tools required
- Can be executed immediately
Cons
- Difficult to check logs
- Complicated process management
🛠️ WSL + tmux (Recommended)
Utilize Linux tools within the Windows Subsystem for Linux.
# Enter WSL
wsl

# Create tmux session
tmux new -s serena

# Execute UV command
uvx --from git+https://github.com/oraios/serena serena start-mcp-server

# Detach: Ctrl + b -> d
Pros
- Same as Linux environment
- Excellent stability
- High functionality
Cons
- WSL setup required
- Learning curve
⚙️ Task Scheduler
Automatic startup using Windows’ standard Task Scheduler.
Win + R→taskschd.msc- “Create Basic Task”
- Trigger: When the computer starts
- Action: Start a program
- Program:
uvx - Arguments:
--from git+https://... serena start-mcp-server
Pros
- Standard Windows feature
- Supports automatic startup
- GUI setup
Cons
- Complicated setup
- Difficult to debug
🌐 Git Bash + nohup-style
Execute Linux-style commands using Git Bash.
# Execute in Git Bash
uvx --from git+https://github.com/oraios/serena serena start-mcp-server &

# Check process
ps aux | grep serena
Pros
- Linux-style operation
- Lightweight
- Easy to use
Cons
- Limited functionality
- Stability issues
🏆 Best Practices on Windows
Development/Test Environment WSL + tmux is the strongest combination.
Production/Server Environment Stable operation with Task Scheduler + PowerShell.
Quick Test Immediate execution with PowerShell Start-Process.
💡 Pro Tip
It is strongly recommended that Windows developers install WSL. In modern web development, checking operations in a Linux environment is essential. Modern tools like UV also run more stably in a WSL environment.
3. More Advanced Usage
Indexing a Project
To get the most out of Serena on a large project, it is recommended to index the code beforehand (analyze and organize its structure). This further improves the AI’s response speed and accuracy.
# Example: Indexing /path/to/your/project
uvx --from git+https://github.com/oraios/serena index-project /path/to/your/project
Integration with Client Tools
Serena’s capabilities are maximized when integrated with clients that support MCP (Machine-Claude Protocol), such as Claude Desktop. By specifying the Serena server in the client tool’s settings, the AI can interact directly with your local environment.
For Windows
This command uses the Windows package manager winget to install Astral’s uv.
winget install --id astral-sh.uv
🔽 What this command installs
| Item | Content |
|---|---|
uv main executable | ✅ Installed |
uvx | ✅ Automatically included (since v0.1.17) |
| Addition to environment variables | ✅ Usually %USERPROFILE%\.cargo\bin or %LOCALAPPDATA%\Programs\uv is automatically added to the PATH (but depends on PC settings) |
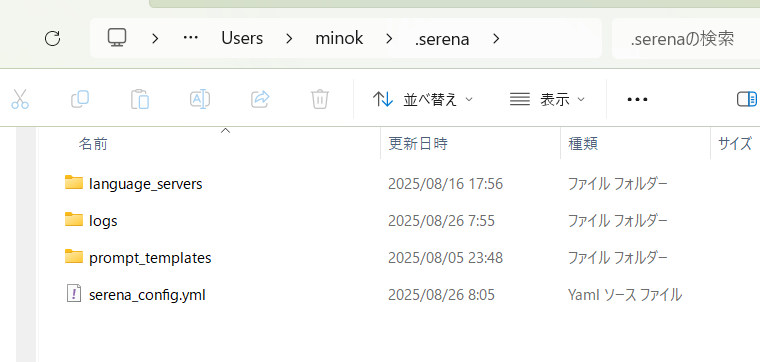
By the way, you might wonder, “I installed uv, but where is serena itself installed?” Actually, uv itself is a Python execution environment manager, and when you call serena, a .serena folder is automatically generated directly under the user directory.
This .serena folder stores the following content:
serena_config.yml… Global configuration filelanguage_servers/… Cache and execution binaries for language serverslogs/… Log filesprompt_templates/(equivalent to contexts/modes) … Definitions for prompts and modes
The specific path on Windows is as follows:
C:\Users\<username>\.serena\
In other words, the mechanism is that “after installing uv with winget install astral-sh.uv, starting serena automatically creates this .serena folder, which becomes the actual storage location.”
About Serena’s Storage Location (A common point of misunderstanding) When you start Serena with uvx (or uv run), a folder named C:\Users\<username>\.serena\ is automatically created on Windows. This is not the installation location for the executable files, but the storage location for global settings and cache (e.g., serena_config.yml, language_servers/, logs/, etc.). Therefore, you do not need to specify .serena as the “execution directory” in Gemini’s settings.json.
On the other hand, the Serena main code is fetched and managed by uvx/uv (direct execution from a GitHub repository, or a temporary environment as a tool). In other words, the point that “.serena = storage for execution modules” is not true is often confused.
Supplement: When to touch .serena
- Changing settings:
C:\Users\<username>\.serena\serena_config.yml - Checking language server cache:
.serena\language_servers\ - Checking logs/clearing cache:
.serena\logs\and others While it is useful as a “storage for settings and data,” it is not the location to specify for the--directoryof the startup command.
4. Recommended for these people
- Developers who handle large codebases
- People who find it troublesome to copy and paste long code to the AI every time
- People who value security and privacy and want to complete their work in a local environment
- People who often feel that “the context is insufficient” in conversations with AI
- People who are thinking of lowering the learning cost of terminal operations
5. Integration with Claude Code
The method for integrating with Serena in Claude Code is described on the official website.
Serena Setup & Usage Guide | Claude | Claude
The following are my notes (copy-pasted from the official site)
Add Serena to the project (execute the following command in the project directory)
claude mcp add serena -- uvx --from git+https://github.com/oraios/serena serena-mcp-server --context ide-assistant --project $(pwd)
The above command displays the following.
Added stdio MCP server serena with command: uvx --from git+https://github.com/oraios/serena serena-mcp-server --context ide-assistant --project /home/mamu/codex-cli to local config File modified: /home/mamu/.claude.json [project: /home/mamu/codex-cli]
Loading initial settings
Start a new conversation in Claude Code and say:
Please load Serena's initial settings
Or:
/mcp__serena__initial_instructions
In Serena, you need to explicitly “activate” a project. Please instruct Claude Code as follows:
Specify with an absolute path:
Please activate the project /path/to/my_project
Specify by project name (if previously activated):
Please activate the project my_project
The activated project is automatically added to serena_config.yml, and a .serena/project.yml is generated for each project.
6. Integration Example with ChatGPT (Serena + ChatGPT)
Similar to Claude, Serena can also be used with ChatGPT. In particular, if you configure it so that ChatGPT can access Serena via MCP (Machine-Centric Protocol), ChatGPT will be able to access your local project and provide accurate assistance.
Example 1: Asking how to use a function
You (to ChatGPT):
Explain the recursive behavior of the `fibonacci()` function in serena://project/src/math/calc.py
ChatGPT (referencing via Serena):
`fibonacci(n)` returns 1 when n is 1 or 2, otherwise it recursively calculates `fibonacci(n-1) + fibonacci(n-2)`.
This is based on the definition of the Fibonacci sequence, but as n gets larger, the number of recursive calls increases exponentially, making it inefficient.
It can be improved with memoization.
Example 2: Advice based on the entire codebase
You:
This project uses Flask, but where should I start to rewrite it in FastAPI?
ChatGPT:
To migrate from Flask to FastAPI, the following changes are necessary:

1. Rewrite the entry point in `app.py` to FastAPI syntax
2. Replace `@app.route()` with `@app.get()` or `@app.post()`
3. Change references from `request.args` or `request.json` to FastAPI's `Request` or parameter types
4. Add `fastapi` and `uvicorn` to `requirements.txt`

According to the analysis from Serena, the main routing definitions are consolidated in `src/routes/api.py`, so it would be smooth to start the migration from there.
Example 3: Asking for the location of a file
You:
Where is the code that generates JWT tokens in this project?
ChatGPT:
The JWT token generation process is in `auth/jwt_utils.py`.
The function `generate_jwt(user_id: int)` is the relevant one, and it creates the token using `pyjwt.encode(...)`.
💡 Features of the ChatGPT and Serena combination
| Feature | Effect |
|---|---|
| 🔍 Code search and explanation | Identifies necessary functions and files from your own codebase |
| 🧠 Continuous context retention | Returns more accurate answers that depend on past questions |
| 🛡️ Security | Serena provides alternative data without sending code directly to OpenAI’s API |
| 🧩 ChatGPT’s knowledge + local reality | Enables the fusion of general knowledge and specific knowledge about your own code |
🙋♂️ Additional convenient points
Even for natural questions that ChatGPT is good at, such as “teach me with examples” or “put it in a table format,” it can answer based on specific data via Serena, making document generation and code reviews more efficient.
✅ Prerequisite: ChatGPT alone does not connect to Serena
The official ChatGPT (web version and mobile app) from OpenAI has no means of directly accessing a local Serena instance.
What can be integrated with Serena are ChatGPT clients that support MCP (Machine-Centric Protocol).
🔧 How to connect ChatGPT and Serena
Method 1: Use ChatGPT Desktop (unofficial app)
https://github.com/lencx/ChatGPT
This is currently the easiest method.
Procedure overview:
- Install ChatGPT Desktop
- Open
config.json - Set Serena as the MCP server
- Access the local project from ChatGPT using
serena://
🔌 config.json setting example (ChatGPT Desktop)
Edit the configuration file as follows (usually ~/.chatgpt/config.json):
{
  "mcpServers": {
    "serena": {
      "command": "/home/username/.local/bin/uv",
      "args": [
        "run",
        "--directory",
        "/home/username/serena",
        "serena-mcp-server"
      ]
    }
  }
}
💡 Note: On Windows, it may be in C:\Users\username\AppData\Roaming\chatgpt\config.json.
✅ ChatGPT usage example (in conversation)
- Keep Serena running (or have ChatGPT run it automatically on startup)
- Talk to ChatGPT like this:
Explain log_error() in serena://project/src/utils/logger.py
Then, ChatGPT will make an MCP call via Serena locally, analyze the corresponding file, and answer.
❗ Notes
| Note | Description |
|---|---|
| Not official ChatGPT | The Desktop version is an open-source third-party client |
| Not usable with OpenAI API | Not usable with the web version or GPT-4 via API |
| Python 3.11 required | The Serena side needs to run in a Python 3.11 environment |
📦 Supplement: It is also possible to use Serena + Claude + ChatGPT together
By using multiple MCP clients (Claude Desktop, ChatGPT Desktop) in parallel, Serena can function as a hub for local analysis by AI.
🧪 Do you really want to use it with the ChatGPT Web version?
It’s not impossible, but it requires indirect methods like the following:
- Output the information generated by Serena to a file
- Upload or copy-paste it to ChatGPT
- Pretend to have referenced the file with a custom prompt
But honestly, that doesn’t bring out the true value of Serena.
✅ Summary
| Question | Answer |
|---|---|
| Can ChatGPT connect to Serena? | ✅ Yes, by using ChatGPT Desktop (unofficial) |
| What about the web version of ChatGPT? | ❌ Cannot connect |
| Where do I configure it? | Write the command and path in config.json |
| How to start the Serena side? | Start serena-mcp-server with uv or uvx |
🧠 So, how does that improve the conversation with ChatGPT?
✅ Answer: It improves when you have a conversation through a Serena-compatible client. In other words, think of it as “ChatGPT’s performance is boosted” when the following two conditions are met:
| Condition | Content |
|---|---|
| ✅ Serena is running | serena-mcp-server is running in the background |
| ✅ Using an MCP-compatible ChatGPT client | e.g., ChatGPT Desktop (unofficial), etc. |
🔍 What improves (ChatGPT × Serena)
| before (normal) | after (via Serena) |
|---|---|
| “What does this function do?” gets an out-of-context, off-target answer | An accurate explanation after reading the local code |
| Need to paste the code every time | Just a serena:// path is enough (super time-saving) |
| Annoying to tell the file location | ChatGPT understands the structure and guides you accurately |
| Mechanical answers | More developer-centric, understanding advice is possible |
🚫 Conversely, it has no effect on the web version of ChatGPT
The one you are talking to right now (ChatGPT web version) has no way to directly access your local environment or Serena.
Therefore, “even if you run Serena right here, nothing will change.”
🧪 If you want to try it
The following setup is the best:
- Install
uvand Serena - Install ChatGPT Desktop (official GitHub)
- Set the Serena startup command in
config.json - Start ChatGPT Desktop
- Ask questions in the
serena://...format!
✨ Example 🗣 In ChatGPT Desktop:
It seems there is a bug in fetch_data() in serena://project/app/main.py, please take a look
🤖 ChatGPT:
The check for the HTTP status code is missing in `fetch_data()`. The exception may be swallowed.
📦 Summary: Even if you install Serena, you need a “window” to connect
| Element | Role |
|---|---|
| Serena | A local AI server that analyzes and retains your project |
| ChatGPT Desktop | A “connecting window” between ChatGPT and Serena |
| ChatGPT itself | A conversational AI. However, it does not have local information |
uvx startup command | The key to calling Serena |
🎯 “If I’m showing a GitHub repository, isn’t Codex (GPT-4) better than Serena?”
I think you have this question. Yes, at first glance, that’s right—but the answer changes depending on the use case and purpose.
✅ Prerequisite Comparison: Serena vs Codex (ChatGPT)
| Comparison Item | Serena (MCP) | Codex / ChatGPT (GPT-4) |
|---|---|---|
| Local environment code | ✅ Direct access possible | ❌ Manual copy-paste or upload |
| Handling of GitHub repositories | ✅ Clone → Analysis possible | ✅ Partial analysis possible with Copilot |
| Privacy | ✅ Local completion | ❌ Sent to OpenAI |
| Multi-file support | ✅ Understands the whole and cross-searches | ⚠️ Context limit (length wall) |
| Continuity (in conversation) | ✅ Remembers file structure and converses | ❌ Answers only based on the current context |
| Auto-completion/writing assistance | ❌ Does not complete | ✅ Very excellent (Copilot) |
| Learning cost | Somewhat high (MCP client required) | Low (can be used as is) |
🔍 3 patterns for showing AI the contents of a GitHub repository
| Method | Example | Suitable case |
|---|---|---|
| 🔹 Copy-paste or zip attachment to Codex (GPT-4) | “Look at this repository” | When you want one-off advice |
| 🔸 GitHub Codespaces + Copilot | AI completion with VSCode integration | To accelerate the coding work itself |
| 🟢 Clone GitHub locally → Index with Serena | Instruct with serena://src/app.py etc. | Privacy-conscious or want to talk to AI long-term |
🧠 When you should choose Serena
- 🚫 The repository on GitHub is private or pre-release
- 🧩 Complex structure that requires design review across multiple files
- 💬 Want to refactor code while having a long-term conversation with ChatGPT or Claude
- 🛡️ Anxious about uploading code to OpenAI
✋ On the other hand, when Codex (ChatGPT) is sufficient
- 🚀 Public repository where it’s okay to show the whole thing casually
- ⏳ Want to request reviews or code corrections in a short time
- 🧪 Light requests such as “just improve this function”
- 🤖 Copilot’s completion is sufficient
💡 Conclusion: It’s easy to understand if you distinguish it like this
| Purpose | Optimal means |
|---|---|
| Short-term GitHub code diagnosis | ✅ Codex (Web version GPT-4) is OK |
| Private project management | ✅ Serena + ChatGPT Desktop or Claude |
| Completion or code generation | ✅ Copilot (ChatGPT cannot complete) |
| Want to “operate a project by conversation” long-term | ✅ Turn AI into an in-house pair programmer with Serena |
🔧 If you are hesitant…
🌱 First try with Codex, and if you feel its limitations, introduce Serena → This is the most stress-free way to proceed.
✅ How will things change with the advent of ChatGPT Code-like systems?
1. Evolution of the integrated environment
What OpenAI is preparing, like “ChatGPT Code,” aims for the following:
- 🧠 Understand the project structure
- 💬 Edit and create code while conversing on the spot
- 🧪 Perform everything from execution to testing in one go
→ This is a future where ChatGPT itself will natively absorb the “context memory” and “cross-file understanding” that Serena was responsible for.
🔄 Serena vs ChatGPT Code-like systems: Change of roles
| Function | Now (Serena + GPT) | Future (ChatGPT Code) |
|---|---|---|
| Understanding of local structure | ✅ Supplemented by Serena | ✅ Towards native support? |
| File operation/execution | ❌ External tools required | ✅ To be integrated |
| Code refactoring through conversation | ✅ Precisely with Serena | ✅ Completed with just ChatGPT? |
| Security | ✅ Local completion | ⚠️ Selection necessary as it is cloud-based |
🧠 What value will remain for Serena even then?
Even if ChatGPT evolves in the future, local-only agents like Serena may retain the following value:
| Remaining value | Description |
|---|---|
| 🔒 Privacy-conscious development sites | Can be completed only within the local environment |
| 🧩 Want to use it as a base for self-made AI integration | Can be used when you want to integrate with Claude or other LLMs |
| 🛠 Users who want to extend AI functions | As a host for self-made MCP functions |
| 🐧 Linux/CLI-oriented developers | Suitable for lightweight & flexibility-oriented operation |
🔚 Conclusion: What to do when ChatGPT Code becomes mainstream?
- ✅ For those who write code, it is likely that the future will be easier with ChatGPT Code
- ❗ However, if security is a priority or local completion is necessary, Serena will also remain
7. Integration with Gemini CLI (The Correct Way)
Summary The Gemini CLI is a client that supports the Model Context Protocol (MCP). To use Serena, you must first register Serena’s MCP server with the Gemini CLI. After registration, Gemini will automatically select and execute Serena’s tools (e.g., symbol search or code editing) based on the context of the conversation. No special serena:// notation is required, but the MCP server configuration itself is mandatory.
Reference: The mechanism for registering and configuring MCP in the Gemini CLI (
mcpServers/gemini mcp add) is detailed in the official guide.
Correcting Common Misconceptions
- Incorrect: “Gemini CLI can use Serena without any special settings.” Correct: MCP server registration (
mcpServersconfiguration orgemini mcp add) is required. - Incorrect: “Gemini CLI automatically assembles and executes
uvx ... serena ....” Correct: We specify Serena’s startup command (e.g.,uvx ... serena start-mcp-server) during registration. Thereafter, Gemini calls Serena’s tools based on that setting. - Incorrect: “There is a special notation like
serena://.” Correct: Such a scheme is unnecessary and not adopted. MCP server configuration is the correct way.
Benefits of Integration (Table)
| Feature | Benefit |
|---|---|
| 🧠 Natural Language Interface | Serena’s rich code understanding tools can be called in conversation (Gemini selects appropriately). |
| 🔐 Secure Execution | Pre-execution confirmation is available by default. Confirmation can also be skipped by setting trust to true (use with caution). |
| 🛠️ Fusion with Other Tools | You can use Gemini’s built-in tools (GitHub/search/file operations) + Serena across the board. |
| 📁 Large Codebase Support | Efficient even with large codebases through Serena’s symbol-level analysis and editing (IDE-like capabilities). |
Reference Links
- Gemini CLI Overview and MCP Integration (Official)
- Gemini CLI: MCP Server Configuration and
gemini mcp add(Official) - Serena Startup Methods (
uvx … serena start-mcp-server) and Recommended Context Settings (Official README)
Let’s actually try it.
Key Points
- The Gemini CLI has built-in tools such as file browsing, listing, and multi-file reading (e.g.,
list_directory/read_file/read_many_files) by default. The “✔ ReadFolder” and “✔ ReadManyFiles” that appear in the logs are Gemini’s own tools, not from Serena. - If you want to use Serena, MCP server registration is mandatory (
mcpServersin settings.json). After registration, Gemini will be able to select and call Serena’s tools in conversation.
1) Serena’s Startup Command (Reference)
Serena can be started directly from uvx (no local installation required).
uvx --from git+https://github.com/oraios/serena serena start-mcp-server
※ This is the standard procedure in the official Serena README.
uvx --from git+https://github.com/oraios/serena serena start-mcp-server --context ide-assistant
This alone can start the Serena MCP server directly. (Adding --context ide-assistant makes it work as an assistant for IDEs, and adding --project "C:/path/to/project" allows you to specify the target project)
2) Register Serena (MCP) with Gemini
Minimum Configuration to Actually Integrate
Project side <project>/.gemini/settings.json (or global %USERPROFILE%\.gemini\settings.json):
{
  "mcpServers": {
    "serena": {
      "displayName": "Serena Coding Agent",
      "command": "uvx",
      "args": [
        "--from", "git+https://github.com/oraios/serena",
        "serena", "start-mcp-server",
        "--context", "ide-assistant"
      ]
    }
  }
}
- If you want to fix
--project, add it with an absolute path:"--project", "C:/path/to/your/project"
Procedure for Operation Check (Shortest)
- Open a new PowerShell and check if
uvx -Vworks. - Start Gemini at the project root →
/mcp reload→/mcp list- It’s OK if it becomes
serena - Connected (… tools cached).
- It’s OK if it becomes
- “Index this directory with Serena” will suggest and execute
project index.
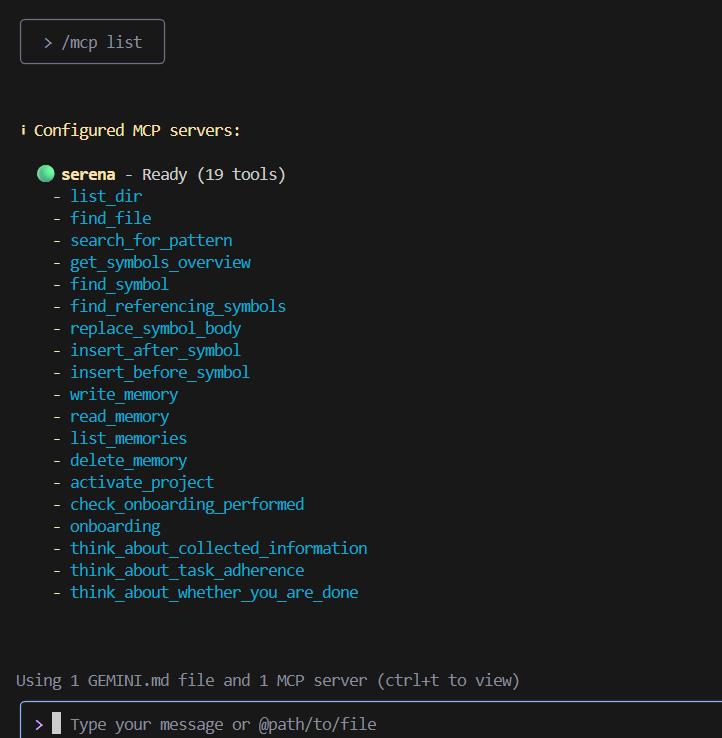
When you start Gemini, the Serena MCP server will start automatically. If you execute /mcp list in that state, it will be displayed as follows.
│ > /mcp list │
╰───────────────╯

ℹ Configured MCP servers:

🟢 serena - Ready (19 tools)
\- list_dir
\- find_file
\- search_for_pattern
\- get_symbols_overview
\- find_symbol
\- find_referencing_symbols
\- replace_symbol_body
\- insert_after_symbol
\- insert_before_symbol
\- write_memory
\- read_memory
\- list_memories
\- delete_memory
\- activate_project
\- check_onboarding_performed
\- onboarding
\- think_about_collected_information
\- think_about_task_adherence
\- think_about_whether_you_are_done

3) (Optional) Pre-index Large Repositories
To speed up the initial run, you can index the project:
uvx --from git+https://github.com/oraios/serena serena project index
(This is the accelerated procedure recommended by the official Serena documentation.)
However, an error occurred. This error appeared during indexing.
Project configuration auto-generation failed after 0.004 seconds
Traceback (most recent call last):
  File "/home/mamu/.cache/uv/archive-v0/MqCQ5wrQ_K5PEzhGkR_n8/bin/serena", line 12, in <module>
    sys.exit(top_level())
             ~~~~~~~~~^^
  File "/home/mamu/.cache/uv/archive-v0/MqCQ5wrQ_K5PEzhGkR_n8/lib/python3.13/site-packages/click/core.py", line 1442, in __call__
    return self.main(*args, **kwargs)
           ~~~~~~~~~^^^^^^^^^^^^^^^^^
  File "/home/mamu/.cache/uv/archive-v0/MqCQ5wrQ_K5PEzhGkR_n8/lib/python3.13/site-packages/click/core.py", line 1363, in main
    rv = self.invoke(ctx)
  File "/home/mamu/.cache/uv/archive-v0/MqCQ5wrQ_K5PEzhGkR_n8/lib/python3.13/site-packages/click/core.py", line 1830, in invoke
    return _process_result(sub_ctx.command.invoke(sub_ctx))
                           ~~~~~~~~~~~~~~~~~~~~~~^^^^^^^^^
  File "/home/mamu/.cache/uv/archive-v0/MqCQ5wrQ_K5PEzhGkR_n8/lib/python3.13/site-packages/click/core.py", line 1830, in invoke
    return _process_result(sub_ctx.command.invoke(sub_ctx))
                           ~~~~~~~~~~~~~~~~~~~~~~^^^^^^^^^
  File "/home/mamu/.cache/uv/archive-v0/MqCQ5wrQ_K5PEzhGkR_n8/lib/python3.13/site-packages/click/core.py", line 1226, in invoke
    return ctx.invoke(self.callback, **ctx.params)
           ~~~~~~~~~~^^^^^^^^^^^^^^^^^^^^^^^^^^^^^
  File "/home/mamu/.cache/uv/archive-v0/MqCQ5wrQ_K5PEzhGkR_n8/lib/python3.13/site-packages/click/core.py", line 794, in invoke
    return callback(*args, **kwargs)
  File "/home/mamu/.cache/uv/archive-v0/MqCQ5wrQ_K5PEzhGkR_n8/lib/python3.13/site-packages/serena/cli.py", line 434, in index
    ProjectCommands._index_project(project, log_level)
    ~~~~~~~~~~~~~~~~~~~~~~~~~~~~~~^^^^^^^^^^^^^^^^^^^\
  File "/home/mamu/.cache/uv/archive-v0/MqCQ5wrQ_K5PEzhGkR_n8/lib/python3.13/site-packages/serena/cli.py", line 447, in _index_project
    proj = Project.load(os.path.abspath(project))
  File "/home/mamu/.cache/uv/archive-v0/MqCQ5wrQ_K5PEzhGkR_n8/lib/python3.13/site-packages/serena/project.py", line 62, in load
    project_config = ProjectConfig.load(project_root, autogenerate=autogenerate)
  File "/home/mamu/.cache/uv/archive-v0/MqCQ5wrQ_K5PEzhGkR_n8/lib/python3.13/site-packages/serena/config/serena_config.py", line 259, in load
    return cls.autogenerate(project_root)
           ~~~~~~~~~~~~~~~~^^^^^^^^^^^^^\
  File "/home/mamu/.cache/uv/archive-v0/MqCQ5wrQ_K5PEzhGkR_n8/lib/python3.13/site-packages/serena/config/serena_config.py", line 198, in autogenerate
    raise ValueError(
    ...<8 lines>...
    )
ValueError: No source files found in /home/mamu/gemini

To use Serena with this project, you need to either:
1. Add source files in one of the supported languages (Python, JavaScript/TypeScript, Java, C#, Rust, Go, Ruby, C++, PHP)
2. Create a project configuration file manually at:
   /home/mamu/gemini/.serena/project.yml

Example project.yml:
  project_name: gemini
  language: python  # or typescript, java, csharp, rust, go, ruby, cpp, php
After some investigation, it turns out that as of August 2025, Serena does not support .bat or .ps1 (PowerShell script) files.
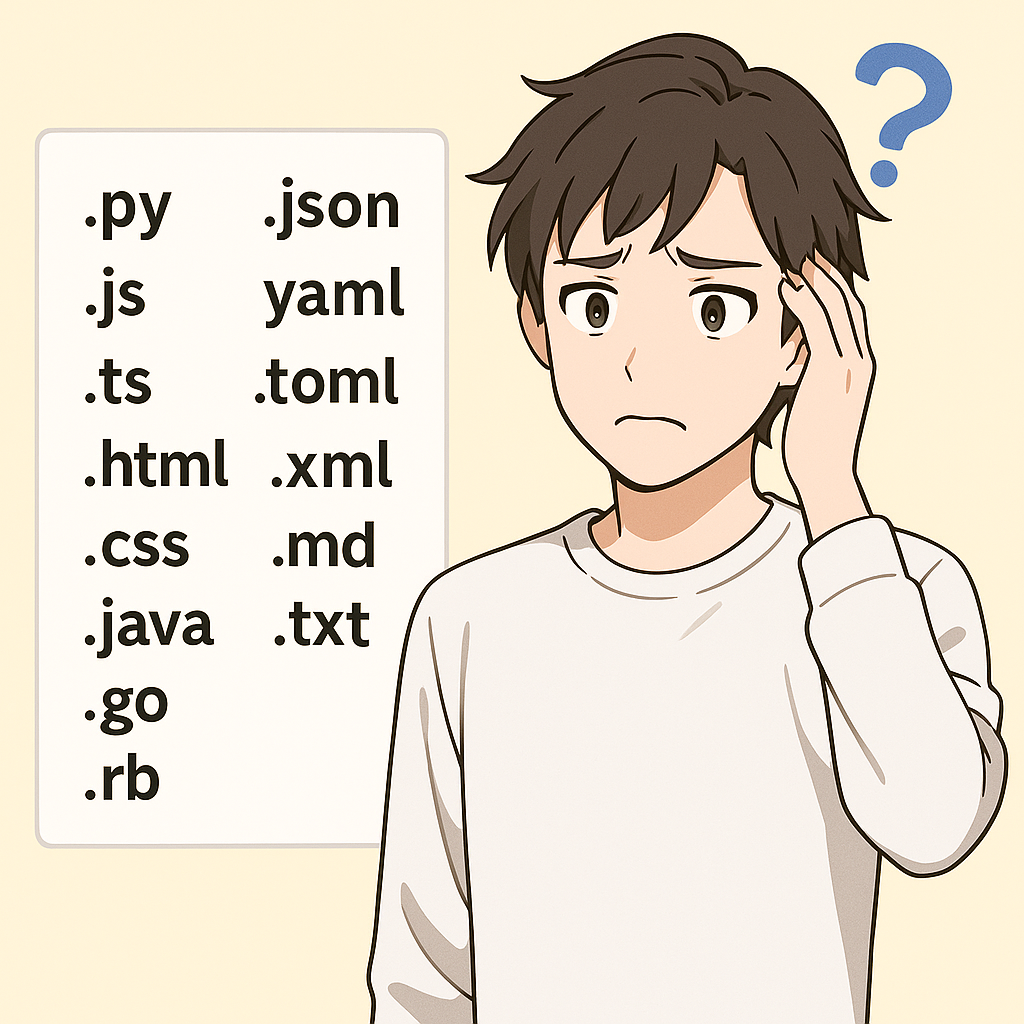
🔍 Languages Supported by Serena (as of August 2025)
As clearly stated in Serena’s [project.yml template] and error messages, the supported languages are as follows:
| Language | Extension |
|---|---|
| Python | .py |
| TypeScript / JavaScript | .ts, .js |
| Java | .java |
| C# | .cs |
| Rust | .rs |
| Go | .go |
| Ruby | .rb |
| C++ | .cpp, .hpp, etc. |
| PHP | .php |
❌ Unsupported File Types
| Type | Extension |
|---|---|
| Windows Batch Script | .bat |
| PowerShell Script | .ps1 |
| Shell Script (Partial Support) | .sh (limited) |
| Markdown/Text Files | .md, .txt (intended to be used with code) |
✅ How to Add Support
Method 1: Manually Create a Project Configuration File + Include .ps1 Files
Although Serena does not formally parse .ps1 files, it is possible to configure it to include them in the files it reads.
Try creating a project.yml file like this:
project_name: gemini
language: python  # Dummy value (can be anything)
include:
  - "**/*.ps1"
  - "**/*.bat"
Then, re-index the project.
✨ Actual Workflow
- Ask the AI (e.g., “I want to know the purpose of all the files.”)
- Serena recognizes and summarizes the contents of the
.ps1,.bat, and.ymlfiles. - The AI receives this information and returns a summary, analysis, and explanation.
In other words, the current interaction is:
🔧 An ideal use case of Serena (backend) + AI (frontend) working in tandem!
🔁 Getting More Out of It
| What you want to do | Example question (for the AI) |
|---|---|
| Visualize the processing flow | “Please illustrate the processing steps of CompactWSLVHD.ps1 step-by-step.” |
| Investigate the cause of a bug | “Are there any bugs in this .ps1 file? Is there any code that would be problematic under WSL specifications?” |
| Make it cross-platform | “Can you make this code work in Mac and Linux environments?” |
| Refactor the code | “Please redesign CompactWSLVHD.ps1 to be more readable.” |
🔧 Addendum: What Serena Does for You
| Feature | Description |
|---|---|
| Indexing | Extracts syntax-based symbols (functions, classes) (not applicable to .ps1 in this case) |
| Cache Management | Reuses information from files that have already been read |
🧠 Serena is a “Static Analysis + Context Retention” Tool
In other words:
🔸 For languages with a parser (like Python), it understands them “with meaning.” 🔸 For unsupported files (like
.ps1), it treats them “as plain text.”
Therefore, while it cannot properly parse and understand the meaning of .ps1 or .bat code, it can be used as a route to pass the contents of those files to the AI.
✍️ Summary: The Best Approach for Now
- Save the following configuration file to
/home/mamu/gemini/.serena/project.yml:
project_name: gemini
language: python  # Tentative designation (has no meaning)
include:
  - "**/*.ps1"
  - "**/*.bat"
- Re-run the indexing:
uvx --from git+https://github.com/oraios/serena serena project index /home/mamu/gemini
The result is as follows:
Indexing symbols in project /home/mamu/gemini…
Timeout waiting for Pyright analysis completion, proceeding anyway
Indexing: 0it [00:00, ?it/s]
Symbols saved to /home/mamu/gemini/.serena/cache/python/document_symbols_cache_v23-06-25.pkl